When working with Kubernetes, one of the first things developers and platform engineers need is a way to expose applications running inside the cluster to the external world. Kubernetes provides a native solution called Ingress, but when using Istio service mesh, the recommended approach is to use the Istio Ingress Gateway.
Let’s take a deep dive and understand what Istio Ingress Gateway is, why it is preferred over native Kubernetes Ingress, and how it works with components like VirtualService and DestinationRule to route and control traffic in a secure and observable manner.
🔹 Introduction to Istio Ingress Gateway
The Istio Ingress Gateway acts as a dedicated load balancer running at the edge of the mesh. It manages inbound traffic to services running inside the cluster, ensuring secure, observable, and policy-enforced access.
When Kubernetes is running in a cloud environment, such as Azure Kubernetes Service (AKS), the Kubernetes LoadBalancer service type automatically provisions a cloud-native load balancer (for example, an Azure Load Balancer) and assigns a frontend IP address. This becomes the public (or private) entry point for all incoming traffic.
So when a user makes a request, it first hits this Cloud Load Balancer, which forwards the traffic to the Istio Ingress Gateway pods running inside the cluster. The Gateway then applies routing rules (as defined in VirtualServices) and forwards the request to the appropriate backend services or pods based on the configuration.
This layered approach ensures that traffic entering the Kubernetes cluster is properly managed and controlled — from cloud-level load balancing to service mesh-level routing and policies.
🔹 Why use Istio Gateway instead of native Kubernetes Ingress?
Kubernetes Ingress is a good starting point but lacks advanced traffic control capabilities. Here’s where Istio Ingress Gateway shines:
-
-
- More advanced routing rules (like header-based, weight-based, or path-based routing)
- Built-in support for mutual TLS and advanced security policies
- Rate limiting and retries
- Traffic shifting and canary deployments
- Integrated observability (metrics, tracing, logging)
- More flexible configuration using VirtualService
-
🔹 How Istio Ingress Gateway Works (End to End Flow)
Let’s break down how a typical request flows from the outside world to your pods:
Client (browser/curl)
    |
[External Load Balancer]
    |
[Istio Ingress Gateway Pod]
    |
[Virtual Service]
    |
[Service or directly Pods]
    |
[Backend Pod]
🚦 Step-by-Step Flow: How Traffic Reaches Backend via Istio Ingress Gateway
-
-
-
Client initiates request (Browser / curl / API client)
-
Example: User accesses
https://myapp.example.com -
The request travels over the internet.
-
-
Request hits External Load Balancer (Cloud Load Balancer or Kubernetes LoadBalancer Service)
-
This is the public-facing load balancer that forwards traffic to Kubernetes.
-
It forwards the request to Istio Ingress Gateway Pod(s).
-
-
Istio Ingress Gateway Pod (Envoy Proxy) receives the request
-
The gateway inspects the request.
-
Matches the request based on configured
GatewayandVirtualServiceresources.
-
-
VirtualService applies routing logic
-
Matches based on
host,path,headers, etc. -
Decides which backend service (or subset) the request should be routed to.
-
(Optional) Applies rewrite rules or other transformations.
-
-
Traffic forwarded to Service or directly to Pods
-
If no
DestinationRule:
→ Routed to KubernetesService→ Kube-proxy → Any backend pod. -
If
DestinationRule(with subsets):
→ Routed directly to specific pod(s) matching subset labels (bypassing service selector).
-
-
Backend Pod processes the request
-
Application running inside the pod receives the request.
-
Processes it and sends the response back following the same reverse path.
-
-
-
🔹 A Closer Look at Gateway Manifest File
Before we go deeper into routing rules, let’s first look at how a typical Istio Gateway resource is defined. This resource acts as a link between external traffic (load balancer / IP) and Istio’s internal traffic management (VirtualService).
📌 Sample Gateway YAML
apiVersion: networking.istio.io/v1beta1
kind: Gateway
metadata:
  name: my-gateway
  namespace: istio-system
spec:
  selector:
    istio: ingressgateway  # Selects the ingress gateway deployment (Envoy pods)
  servers:
  - port:
      number: 80
      name: http
      protocol: HTTP
    hosts:
    - "myapp.example.com"
📌 Explanation of key fields
-
-
- apiVersion / kind / metadata
Standard Kubernetes resource details. - selector
This tells Istio which ingress gateway deployment should serve this Gateway configuration. Usually, the default ingress gateway (istio: ingressgatewayselector) is used, but custom ingress gateways can also be created. - servers
Defines the ports and protocols (HTTP, HTTPS, etc.) that this Gateway will listen on.-
- port.number → Port on which Gateway listens (80 in this case)
- port.protocol → Traffic protocol (HTTP, HTTPS, TLS, etc.)
- hosts → The domains this Gateway will accept traffic for. (
*for all hosts or specific hostnames likemyapp.example.com)
-
- apiVersion / kind / metadata
-
Example explanation :
In the above example, the Gateway listens on port 80 for HTTP traffic coming to myapp.example.com and forwards it internally as per VirtualService rules.
Note: TLS termination can also be configured here using tls settings inside servers block for secure (HTTPS) traffic.
🔹 What is VirtualService?
A VirtualService in Istio defines how requests are routed to a service within the mesh. You can think of it as the “traffic rulebook” that tells the Ingress Gateway or any other proxy how to handle incoming traffic — based on hostnames, paths, headers, and other attributes.
Without VirtualService, the default Kubernetes Service routing (simple round robin) applies. With VirtualService, you can define advanced routing strategies like:
-
-
- Path-based routing (example.com/api → service A, example.com/web → service B)
- Header-based routing
- Traffic shifting (50% → v1, 50% → v2)
- Fault injection (for testing failure scenarios)
- URL rewrite and redirects
-
📌 Sample VirtualService YAML
apiVersion: networking.istio.io/v1beta1
kind: VirtualService
metadata:
  name: myapp
spec:
  hosts:
  - myapp.example.com
  gateways:
  - my-gateway
  http:
  - match:
    - uri:
        prefix: /
    rewrite:
      uri: /
    route:
    - destination:
        host: myapp
        port:
          number: 8080
📌 Explanation of key fields
-
-
- hosts
The domain names this VirtualService applies to (matches incoming Host header). - gateways
Defines which Gateway this VirtualService is linked to. Without it → internal mesh only. With it → applies for ingress traffic. - http
Defines HTTP traffic rules. You can have multiple rules based on match conditions. - match
Defines conditions like URI path. In this case, prefix/means all paths. - rewrite
Rewrites the incoming request path before sending to backend. - route
Specifies the destination service and port.
- hosts
-
What does rewrite: uri: "/" mean and why use it?
It rewrites any incoming URI path to / before reaching the backend service. For example, if user requests /products/list, the backend service receives it as /.
Use case: This is useful when your backend application expects all traffic at root path and does not handle URI prefixes. It simplifies backend routing.
🔹 What is DestinationRule?
A DestinationRule defines policies that are applied after routing occurs — basically how traffic behaves when it reaches the destination service.
While VirtualService decides where to send traffic, DestinationRule decides how to handle traffic at the destination.
It can be used for:
-
-
- Defining subsets (version-based routing → v1, v2)
- Load balancing policy (round robin, least request, random)
- Enabling TLS for backend service
- Connection pool and outlier detection
-
📌 Sample DestinationRule YAML
apiVersion: networking.istio.io/v1beta1
kind: DestinationRule
metadata:
  name: myapp
spec:
  host: myapp
  subsets:
  - name: v1
    labels:
      version: v1
  - name: v2
    labels:
      version: v2
  trafficPolicy:
    loadBalancer:
      simple: LEAST_REQUEST
📌 Explanation of key fields
-
-
- host
The name of the service to which this rule applies. - subsets
Defines groups of backend pods using labels. Useful for versioning (canary or blue/green deployments). - trafficPolicy
Defines how traffic should be handled after routing. - loadBalancer.simple
In this example,LEAST_REQUESTmeans traffic will be forwarded to the pod with the fewest active requests.
- host
-
Note: Subsets only take effect when they are referenced in VirtualService. Without subsets, DestinationRule applies for entire service.
📌 Is DestinationRule mandatory?
No. If simple routing is sufficient → VirtualService alone works. DestinationRule is required only when advanced controls are needed (versioning, TLS, load balancing).
📌 Summary of VirtualService vs DestinationRule
| Aspect | VirtualService | DestinationRule |
|---|---|---|
| Defines | Where to route traffic | How to handle traffic at destination |
| Scope | Before reaching destination | After reaching destination |
| Use cases | Path routing, traffic shifting | Subsets, load balancing, TLS |
| Mandatory | Yes (for routing) | No (optional) |
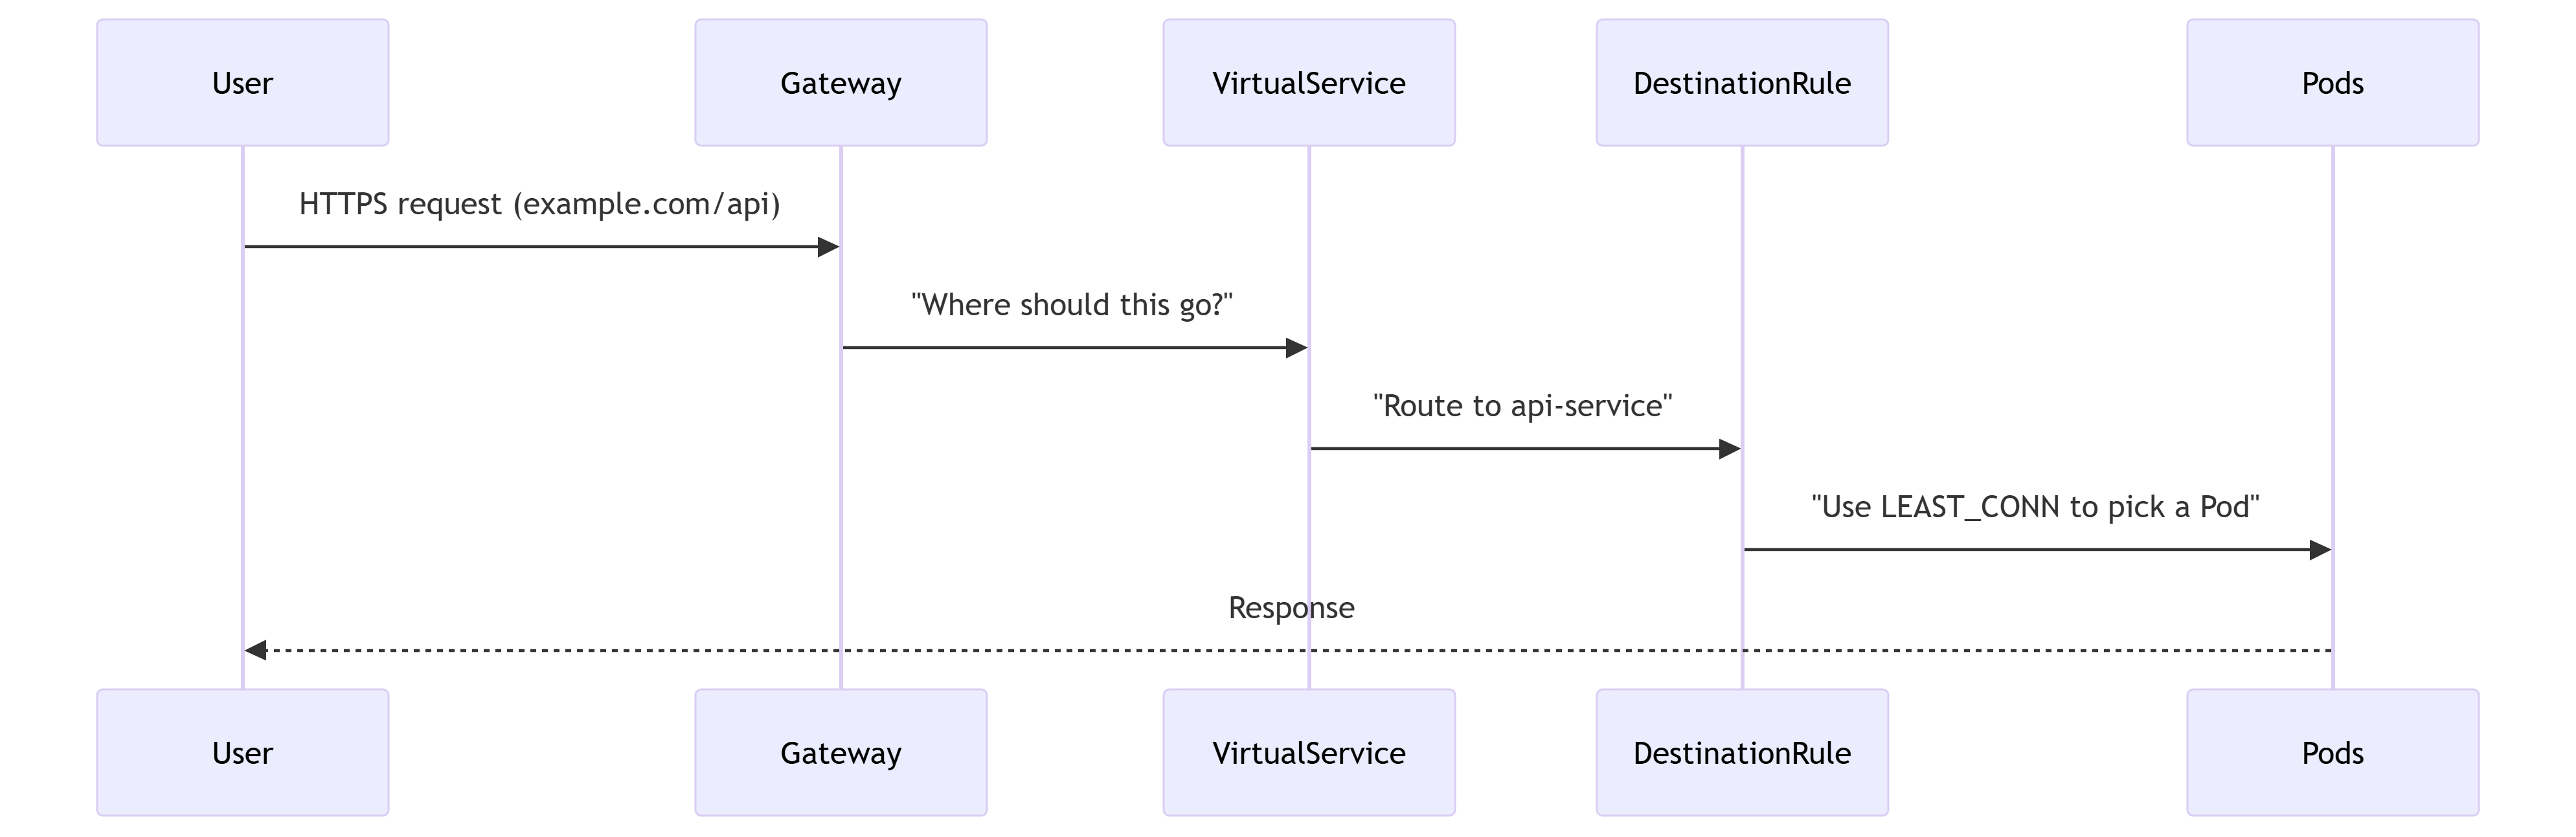
How They Work Together ?
-
-
Gateway receives a request for
https://example.com/api. -
VirtualService matches the
/apipath and routes toapi-service. -
DestinationRule ensures traffic is load-balanced across
api-servicePods usingLEAST_CONN.
-
Note on HTTPS : When exposing applications over HTTPS, there are a few additional considerations, such as how and where to configure certificates for secure communication through the Istio Ingress Gateway.
To keep this article focused, we have covered these details in a dedicated article. Please refer to that for a complete explanation of HTTPS setup, certificate management, and integration options with services like Azure Key Vault.
🔹 Istio Ingress Gateway Scaling Considerations
The Istio Ingress Gateway acts as the main entry point for all external traffic into your Kubernetes cluster. During normal times, its workload may be moderate, but during peak hours or sudden traffic bursts (such as product launches, sales, or marketing events), this component can become a bottleneck. If the gateway does not scale properly, it may result in failed connections, increased latency, or even downtime.
Therefore, scaling the Ingress Gateway is essential to ensure high availability, prevent service disruption, and maintain optimal performance — especially in production environments.
1. Horizontal Pod Autoscaling (HPA)
Istio Ingress Gateway runs as a Kubernetes Deployment, which supports automatic scaling using Horizontal Pod Autoscaler (HPA). HPA ensures that the number of Gateway pods dynamically adjusts based on incoming traffic and resource usage.
Example HPA configuration:
apiVersion: autoscaling/v2
kind: HorizontalPodAutoscaler
metadata:
  name: istio-ingress-hpa
  namespace: istio-system
spec:
  scaleTargetRef:
    apiVersion: apps/v1
    kind: Deployment
    name: istio-ingressgateway
  minReplicas: 2  # Minimum for high availability
  maxReplicas: 10 # Maximum under peak load
  metrics:
  - type: Resource
    resource:
      name: cpu
      target:
        type: Utilization
        averageUtilization: 70
| Setting | Recommendation | Why It Matters |
|---|---|---|
| minReplicas | ≥ 2 | Prevents downtime if a pod crashes or during rolling updates |
| maxReplicas | Based on peak traffic | Allows the gateway to handle sudden and large traffic spikes |
| metrics | CPU + custom metrics | Scales based on real demand, not static allocation |
2. Resource Requests and Limits
Kubernetes schedules pods based on requested resources. Defining proper requests and limits ensures that the Ingress Gateway always has enough CPU and memory to handle traffic while avoiding resource starvation.
resources:
  requests:
    cpu: "1000m"
    memory: "1Gi"
  limits:
    cpu: "2000m"
    memory: "2Gi"
Note: Always monitor actual usage and tune these values.
Under-provisioning can lead to throttling and latency issues, while over-provisioning wastes cluster resources.
3. Load Balancer Configuration
In cloud environments like AKS, the Kubernetes service of type LoadBalancer exposes the Ingress Gateway externally. Configuring the right type of load balancer ensures better performance, availability, and resilience.
-
-
- Standard SKU Load Balancer is recommended for production for better reliability and SLAs. (Anyway…Basic SKU Load Balancer will be retired this year, so Standard LB will be the only option).
- Availability Zones should be enabled to ensure regional redundancy and avoid zone-level failures.
-
4. Rate Limiting
During traffic surges or malicious attacks, it is important to protect your backend services. Rate limiting using EnvoyFilter helps prevent overloading of backend systems by rejecting or throttling excess requests.
apiVersion: networking.istio.io/v1alpha3
kind: EnvoyFilter
metadata:
  name: rate-limit
spec:
  configPatches:
  - applyTo: HTTP_FILTER
    patch:
      operation: INSERT_BEFORE
      value:
        name: envoy.filters.http.ratelimit
        typed_config:
          "@type": type.googleapis.com/envoy.extensions.filters.http.ratelimit.v3.RateLimit
          domain: istio-ingress
          failure_mode_deny: true
5. Monitoring and Alerts
Scaling without observability is dangerous. Set up monitoring and alerts to track the health of the Ingress Gateway and its load levels.
-
-
- CPU/Memory usage – via Prometheus
- Request latency (e.g. P95, P99) – via Grafana
- Error rates – monitor 4xx/5xx responses
-
Alerts should be configured to notify operators when thresholds breach, so proactive scaling or tuning can be performed.
6. Zero-Downtime Upgrades
Upgrading Ingress Gateway should not disrupt live traffic. Use Kubernetes best practices like RollingUpdate deployment strategy and PodDisruptionBudget (PDB) to ensure at least some pods remain available during upgrades.
-
- RollingUpdate → ensures new pods come up before old ones are terminated
- PodDisruptionBudget → defines minimum number of pods that must be available during voluntary disruptions
apiVersion: policy/v1
kind: PodDisruptionBudget
metadata:
  name: gateway-pdb
spec:
  minAvailable: 1
  selector:
    matchLabels:
      istio: ingressgateway
