Let’s talk about Git branching — one of those things that seems simple on the surface but opens up a world of flexibility, structure, and sometimes… confusion.
But don’t worry. We’re not going to drown in jargon here. Instead, I’ll walk you through it like we’re sitting at the same desk, working on the same project — using Azure Repos as our base.
🌱 Why Do We Even Need Branches?
Let’s say you’re building a login feature. You don’t want to risk breaking the main code while you experiment. So what do you do?
You create a branch — kind of like a sandbox where you can build, break, fix, and rebuild — without bothering anyone else.
When you’re happy with it, you merge that branch back into main. That’s branching. And Git makes it so smooth you’ll wonder how you ever coded without it.
🔒 Branch Protection: Locking Main and Requiring PRs
While branching gives you freedom to experiment, it’s crucial to protect your main branch (or master in older repos). Here’s how mature teams enforce safety:
1. Lock the main branch:
-
-
- Prevent direct pushes to
main– all changes must come via pull requests. - In Azure Repos: Project Settings → Repositories → Select your repo → Policies → Enable “Require a pull request to merge“.
- Prevent direct pushes to
-
2. Require approvals and prevent self-approval:
-
-
- Set minimum reviewers (at least 1).
- Enforce “Prohibit the submitter from approving their own changes” in Azure Repos:
- Under Branch Policies, enable “Check for linked work items” (optional but recommended).
- Scroll to “Approvers” and check “Requestors can’t approve their own changes”.
-
3. Add status checks (Optional but recommended):
-
-
- Require builds/tests to pass before merging.
- Enable “Require approval from code owners” if your repo uses
CODEOWNERS.
-
💡 Why this matters: These practices prevent accidental breaks, enforce code reviews, and maintain audit trails. Even solo developers benefit from this discipline!
🧭 Common Branching Strategies in Practice
Teams typically adopt one of these two branching approaches, depending on their size and release frequency:
1. Git Flow (Structured Workflow)
Best for: Large teams with scheduled releases
-
-
- Main branches:
main– Production-ready codedev– Integration branch for features
- Supporting branches:
feature/*– New functionality (e.g.,feature/login)release/*– Preparation for releases (e.g.,release/v1.2)hotfix/*– Critical production fixes
- Main branches:
-
Pros : Clear structure, good for versioned releases
Cons : More complex, longer-lived branches
2. Trunk-Based Development (Lean Workflow)
Best for: Small teams with continuous delivery
-
-
- Single main branch:
main(ortrunk) - Short-lived branches:
- Typically exist for 1-2 days max
- Named by task (e.g.,
user-auth-fix)
- Frequent merges to main (multiple times daily)
- Single main branch:
-
Pros : Simpler, faster integration
Cons : Requires strong CI/CD and testing
How to choose?
• Use Git Flow if you have: Versioned releases, dedicated QA phases, or multiple environments
• Use Trunk-Based if you: Release continuously, have robust automated testing, or value rapid iteration
🔁 Merging in Azure Repos — What Actually Happens ?
So now you’ve built your login feature on a branch. You raise a pull request (PR) to merge it into main.
Azure Repos asks: How do you want to merge this?
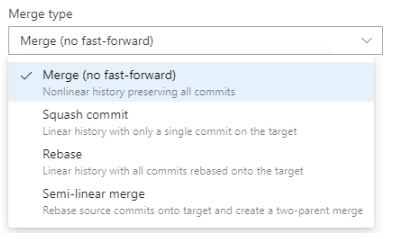
And you get four options. Let’s break them down — especially what happens to your commits in each case.
✅ 1. Merge Commit
This is the classic merge — like officially stamping “merged” in your Git history.
💡 What it does:
-
-
-
Keeps all commits from your feature branch.
-
Adds one extra merge commit on top:
Merge branch 'feature/login' into main.
-
-
📌 Your commit history in main will now show:
// Before merge:
main:       commit ab82fa  ← "Refactor header"
feature:    commit b3fd94  ← "Initial login setup"
            commit c9a217  ← "Add login form layout"
            commit f3d12c  ← "Fix password validation"

// After merge commit into main (oldest to newest):
commit ab82fa  ← "Refactor header"
commit b3fd94  ← "Initial login setup"
commit c9a217  ← "Add login form layout"
commit f3d12c  ← "Fix password validation"
commit f7a321  ← "Merge branch 'feature/login' into main"
✅ Why use this:
-
-
-
You retain all granular history.
-
Easy to audit who did what and when.
-
Great for production or enterprise teams.
-
-
✂️ 2. Squash and Merge
This one flattens everything into a single clean commit.
💡 What it does:
-
-
-
Combines all your feature branch commits into one new commit.
-
Adds only that single commit to
main. -
The original commits remain only in the feature branch (and are lost if the branch is deleted).
-
-
📌 History in main will look like:
// Feature branch history before squash:
commit b3fd94  ← "Initial login setup"
commit c9a217  ← "Add login form layout"
commit f3d12c  ← "Fix password validation"

// After squash into main:
commit ab82fa  ← "Refactor header"
commit d1e99a  ← "Add login feature"
✅ Why use this:
-
-
-
Keeps the
mainbranch tidy. -
Good for small features or if your commits aren’t meaningful.
-
Perfect when you don’t want “fix typo” and “oops” cluttering history.
-
-
⚠️ Downside:
You lose the ability to trace the smaller steps behind that feature permanently if the branch is deleted.
🔁 3. Rebase and Merge
This is like rewriting history — in a good way.
💡 What it does:
-
-
Replays your feature branch commits one by one on top of the latest
main. -
No merge commit is added.
-
History appears as if you developed your feature after the latest changes in
main.
-
📌 What main will look like:
// Before rebase:
main:       commit ab82fa  ← "Refactor header"
feature:    commit b3fd94  ← "Initial login setup"
            commit c9a217  ← "Add login form layout"
            commit f3d12c  ← "Fix password validation"

// After rebase and merge into main:
commit ab82fa  ← "Refactor header"
commit b3fd94  ← "Initial login setup"
commit c9a217  ← "Add login form layout"
commit f3d12c  ← "Fix password validation"
✅ Why use this:
-
-
-
Super clean, linear history.
-
All commits are preserved.
-
Great for advanced workflows and CI/CD pipelines.
-
-
⚠️ Caution:
Don’t rebase shared branches — it rewrites commit IDs and requires force-pushing (git push --force), which can disrupt collaborators. Best used before merging, not after.
🔀 Semi-Linear Merge (Azure Repos)
What it does:
-
-
First, it rebases your feature branch commits onto the latest
main(so you get a clean, linear history). -
Then, it performs a merge commit to bring them into
main.
-
You get the clarity of rebase and the *visibility of a merge commit. This helps when your team wants clean history and a visible “merge point” for tracking purposes.
// Before semi-linear merge:
main:       commit ab82fa  ← "Refactor header"
feature:    commit b3fd94  ← "Initial login setup"
            commit c9a217  ← "Add login form layout"
            commit f3d12c  ← "Fix password validation"

// After rebase + merge commit into main:
commit ab82fa  ← "Refactor header"
commit b3fd94  ← "Initial login setup"
commit c9a217  ← "Add login form layout"
commit f3d12c  ← "Fix password validation"
commit f7a321  ← "Merge branch 'feature/login' into main"
When to use it:
-
-
-
When your team wants clean commit history like rebase
-
But also needs a clear merge commit to track pull request merges or review approvals
-
-
💬 Note: “Semi-Linear Merge” isn’t a standard Git command — it’s a named option provided by Azure Repos. Behind the scenes, it performs a rebase followed by a merge commit. While other platforms like GitHub or GitLab support similar workflows (e.g., rebase before merge), they don’t expose it as a dedicated merge type in the UI like Azure Repos does.
📊 Quick Comparison: Merge Commit vs Squash vs Rebase
| Strategy | Keeps Feature Commits? | Adds Merge Commit? | History Style | Best Use Case |
|---|---|---|---|---|
| Merge Commit | ✅ Yes | ✅ Yes | Non-linear | Production, audits |
| Squash and Merge | ❌ No (one commit) | ❌ No | Linear | Clean merges, small features |
| Rebase and Merge | ✅ Yes | ❌ No | Linear | Advanced teams, CI/CD clarity |
🧓 What’s a Stale Branch ?
Ever created a branch, forgot about it, and came back weeks later?
Meanwhile, main has moved ahead with new changes. Your branch hasn’t kept up. That’s a stale branch — and it’s a recipe for conflicts.
💡 Fix it:
-
-
-
Regularly pull in updates from
main(creates a merge commit):git pull origin main
Or for cleaner history, rebase instead:
git fetch origin
git rebase origin/main
-
-
And if you’re done with the branch? Just delete it. Keeps things tidy.
⚔️ Why Merge Conflicts Happen (And How to Handle Them)
Conflicts happen when Git doesn’t know which version of a file to keep.
Example:
-
-
-
You changed a line in
main.py -
Your teammate also changed the same line in their branch
-
-
Now Git’s confused — and you get a conflict.
But it’s not the end of the world.
🛠️ Resolving Conflicts the Easy Way (with VS Code)
You don’t have to squint through the terminal to fix merge conflicts.
If you use VS Code, you get a friendly UI:
-
-
Git highlights the conflict in the file
-
You choose:
-
-
-
-
- Accept current (your version)
- Accept incoming (theirs)
- Accept both
- Or just edit it manually
-
-
-
-
Save and mark as resolved
-
🎯 Want even smoother handling?
-
-
-
- Install the Azure Repos extension for VS Code
- Connect to your Azure DevOps account
- You’ll get built-in support for pull requests, conflict resolution, commits, and more — right inside your editor.
-
-
🔁 What Is Git Rebase ?
Let’s revisit rebase, since it often trips people up.
Imagine this: You’ve worked on your branch for a week, but main has had changes too.
If you just merge main into your branch, your history gets a little messy.
With rebase, Git rewrites your branch as if you started it from the latest main.
So:
git checkout feature/login
git rebase main
This keeps the history linear and clean, and avoids unnecessary merge commits.
✅ Use it before merging to main on private branches.
❌ Avoid it on shared branches or after pushing — rewriting history (git push --force) will disrupt teammates.
🔑 Branching Thumb Rules
-
-
- 🔒 Lock main branch – Only allow updates via approved PRs
- 👁️ Enforce 4-eye principle – Require approvals (no self-approval)
- 🌿 Never commit directly to main – Always use feature/fix branches
- ⏱️ Keep branches short-lived (merge within 2-3 days)
- ✏️ Write meaningful commit messages – Explain “why” not just “what”
- 🏷️ Tag releases when promoting to main (v1.0.0, v1.1.0)
- 🤝 Prefer squash merges for features, merge commits for hotfixes
- 🚫 Restrict branch policy edits to repo admins only
- 🧹 Delete merged branches regularly to avoid clutter
- ⚡ Rebase often to avoid big merge conflicts
-
💬 Final Thoughts
Branching is one of the superpowers Git gives you — and Azure Repos makes it even more intuitive.
Whether you want full history, clean commit logs, or bulletproof workflows, there’s a strategy that fits. Try them out, make a few mistakes (it’s okay!), and you’ll find what works best for your team.
And the next time you see “Complete pull request” in Azure Repos — you’ll know exactly what’s happening behind the scenes.
