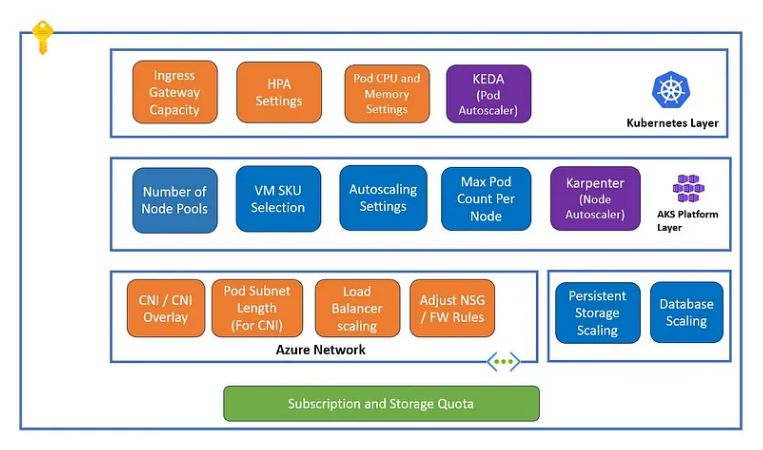
Capacity management and autoscaling in Azure Kubernetes Service (AKS) are crucial components in ensuring that your Kubernetes cluster remains responsive, cost-efficient, and scalable to meet varying workloads.
Managing these elements effectively requires a holistic approach that integrates considerations from both the Kubernetes layer (application-focused) and the underlying cloud platform layer (infrastructure-focused).
This article delves into the key aspects of Kubernetes capacity management and autoscaling, offering insights into best practices and strategic decision-making to optimize your AKS environment.
A) Kubernetes Layer
- Horizontal Pod Autoscaler (HPA) Settings
The Horizontal Pod Autoscaler (HPA) is a fundamental tool in Kubernetes for managing the scaling of pods based on observed CPU utilization or other custom metrics.
However, setting up and configuring the HPA requires careful planning to ensure that it aligns with your application’s performance needs without leading to unnecessary costs or resource wastage.
Min/Max Pod Counts in HPA :
Initial Setup Considerations: When configuring the HPA, defining the minimum and maximum pod counts is essential. The minimum pod count should ensure that your application can handle the baseline level of traffic, even during off-peak times. This ensures that your application remains responsive and can handle sudden, unexpected spikes in traffic. Conversely, the maximum pod count should be based on the capacity of your backend services, the limits of your database connections, and the physical infrastructure available to your cluster.
Right-Sizing Decisions: Right-sizing your pod counts involves analyzing historical traffic data and understanding your application’s behavior under various load conditions. For example, if your application experiences high traffic during certain hours of the day, you might configure the HPA to allow more pods during these times, while reducing the count during low-traffic periods. It’s crucial to avoid over-provisioning, which can lead to unnecessary costs, and under-provisioning, which can result in degraded performance and user experience.
Seasonal and Peak Adjustments: For businesses with predictable seasonal spikes, such as retail during the holiday season, it’s wise to adjust the HPA settings in anticipation of these peaks. This might involve temporarily increasing the maximum pod count or even scheduling predefined HPA policies to activate during these periods.
Aggressiveness of Scaling in HPA:
Scale-Up Frequency: The frequency of scale-up operations should be tailored to the nature of your workloads. For latency-sensitive applications, such as real-time analytics or high-frequency trading platforms, the HPA should be configured to react quickly to increases in load. This can be achieved by lowering the thresholds for CPU or memory utilization that trigger scale-ups. However, for less critical applications, where slight delays are acceptable, you can configure a more conservative scaling policy to prevent unnecessary resource allocation.
Scale-Down Frequency in HPA: Scale-down operations are equally important but must be handled with care to avoid disrupting services. Kubernetes allows you to set a cool-down period between scaling events, which prevents the HPA from scaling down too quickly after a load spike subsides. This cool-down period ensures that your application has time to stabilize before resources are reduced, preventing a situation where pods are terminated prematurely, leading to potential service degradation.
2. Pod CPU and Memory Settings
Resource requests and limits are critical in ensuring that each pod in your Kubernetes cluster has access to the necessary CPU and memory resources. These settings directly impact how Kubernetes schedules pods on nodes and how the cluster performs under load.
Resource Requests and Limits :
Necessity of Setting Requests and Limits: Defining CPU and memory requests is crucial for mission-critical workloads. Requests ensure that a certain amount of resources is reserved for a pod, preventing it from being starved of resources. Limits, on the other hand, cap the maximum resources a pod can consume, preventing it from overwhelming the node and affecting other pods running on the same node. For example, if you’re running a database inside a pod, you might want to set higher resource requests to guarantee its performance, while limiting its maximum resource usage to ensure it doesn’t consume too much of the node’s resources.
Avoiding Over-Allocation: While it’s important to set resource limits, over-allocation can lead to inefficient use of your infrastructure. For example, setting excessively high CPU or memory limits might cause Kubernetes to underutilize the available resources, leading to increased costs without any tangible performance benefits. This is particularly relevant for applications that have predictable, low resource requirements but are assigned overly generous limits.
Dynamic Workloads Consideration: For workloads that are less critical or have unpredictable resource demands, you might consider not setting strict limits, allowing the pod to use resources as needed. However, this approach requires careful monitoring to ensure that such workloads do not disrupt other critical services.
Vertical Scaling vs. Horizontal Scaling :
Use Cases for Vertical Scaling: Vertical scaling involves increasing the resources (CPU, memory) allocated to a single pod, which can be effective for applications that are single-threaded or stateful, where adding more pods does not improve performance. For example, a legacy application that cannot be easily scaled horizontally might benefit from vertical scaling.
Use Cases for Horizontal Scaling: Horizontal scaling, on the other hand, involves adding more pods to handle increased load. This is typically more effective for stateless applications, such as web servers or microservices, where the workload can be distributed across multiple instances. Horizontal scaling is often preferred in cloud-native environments due to its alignment with the principles of microservices and containerization.
Combining Both Strategies: In some scenarios, a combination of vertical and horizontal scaling might be necessary. For example, you might start by vertically scaling a database pod to handle increased load, and as the load grows further, introduce horizontal scaling to distribute the traffic across multiple pods. Kubernetes allows you to mix these strategies, but it requires careful planning to avoid resource contention and ensure efficient use of your cluster’s capacity.
3. Ingress/Gateway Capacity and Traffic Handling
Ingress controllers and gateways are critical components for managing traffic into your Kubernetes cluster. They act as the entry points, routing external traffic to the appropriate services within the cluster. Properly configuring these components is essential to avoid bottlenecks and ensure smooth traffic flow.
Avoiding Bottlenecks:
Rate Limiting: Implementing rate limiting at the ingress level can protect your backend services from traffic surges that could overwhelm them. For example, if your application is subject to sudden bursts of traffic, such as during a product launch or marketing campaign, rate limiting can help ensure that the traffic is spread evenly, preventing any single service from being overloaded. This also adds a layer of security by mitigating the risk of denial-of-service attacks.
Number of Replicas: The ingress controller itself needs to be scalable to handle the incoming traffic efficiently. This involves configuring multiple replicas of the ingress controller to ensure high availability and load distribution. During periods of high traffic, such as Black Friday sales for an e-commerce site, having multiple replicas can ensure that no single ingress controller becomes a bottleneck, and that traffic is evenly distributed across the backend services.
4. Advanced Scaling with KEDA
KEDA (Kubernetes Event-Driven Autoscaling) enhances Kubernetes’ native scaling capabilities by providing more granular and dynamic scaling options.
Event-Driven Scaling: KEDA allows scaling based on events external to Kubernetes, such as messages in a queue or custom metrics from an external monitoring system. This is particularly useful for event-driven architectures, where the workload is not constant but fluctuates based on incoming events. For example, in a financial application processing transactions, KEDA can scale pods up or down based on the number of transactions pending in a queue, ensuring that resources are allocated dynamically as the workload demands.
Fine-Tuning Policies: With KEDA, you can fine-tune scaling policies to align with the specific needs of your event-driven workloads. This might involve setting precise thresholds for scaling actions or integrating with custom metrics that provide more context-specific insights into workload demands. This level of control ensures that scaling decisions are not only responsive but also aligned with business objectives, such as cost management or performance optimization.
B) Underlying Platform Layer
- Node Pool Settings
Node pools in AKS represent collections of nodes with identical configurations. Configuring node pools correctly is essential for optimizing resource usage, cost, and performance in your Kubernetes environment.
Number of Node Pools :
Workload Segmentation: Segregating workloads into different node pools allows for more granular control over resource allocation. For instance, you can create separate node pools for development, testing, and production environments, each with tailored configurations that match their specific requirements. This approach not only optimizes resource usage but also helps in maintaining isolation between environments, reducing the risk of cross-environment contamination or performance issues.
Cost Optimization Strategies: Different workloads have different resource demands, and by aligning node pools with appropriate VM SKUs, you can optimize costs. For example, lightweight workloads such as microservices might run on cost-effective, lower-tier VMs, while high-performance workloads like data processing might require high-memory or GPU-enabled nodes. By carefully selecting the right VM SKU for each node pool, you can reduce costs without compromising on performance.
VM SKU Selection:
Right-Sizing for Workloads: The process of right-sizing involves selecting VM SKUs that match the specific resource requirements of your workloads. For example, if your application is CPU-bound, choosing a VM SKU with a higher CPU-to-memory ratio would be more cost-effective than one with excess memory. Conversely, memory-intensive applications, such as large in-memory databases, would benefit from VMs with higher memory capacity. The goal is to avoid both under-provisioning, which can lead to performance issues, and over-provisioning, which can increase costs unnecessarily.
Scalability Considerations: When selecting VM SKUs, it’s also important to consider the scalability of the chosen SKU. Some VM families have higher limits on the number of instances that can be deployed, which is critical for clusters expected to scale significantly. Ensuring that your chosen SKU can scale to meet future demands is crucial for avoiding capacity bottlenecks and ensuring a smooth scaling process.
Max Number of Pods per Node:
Carefully configure the maximum number of pods per node to avoid overloading nodes and ensure balanced resource distribution. This setting impacts scheduling efficiency and the overall scalability of your cluster.
Autoscaling Settings:
Cluster Autoscaler Configuration: The Cluster Autoscaler automatically adjusts the size of the node pool based on the resource requirements of the pods. Proper configuration involves setting thresholds for adding or removing nodes that align with your application’s performance needs and cost considerations. For instance, you might configure the autoscaler to add nodes quickly when a large batch of jobs is submitted, but to remove nodes more slowly to avoid thrashing and frequent scaling events.
Subscription Quota Management: In Azure, each subscription has quotas that limit the amount of resources you can deploy, such as the number of VMs or the total CPU cores. It’s essential to monitor these quotas to ensure that your cluster can scale as needed without hitting these limits. If your scaling needs exceed the default quotas, you can request increases from Azure support, but this requires proactive planning to avoid disruptions.
2. Network and IP Address Capacity
Networking is a critical aspect of Kubernetes clusters, especially in large deployments where the number of pods and services can quickly consume available IP address space. Proper network planning ensures that your cluster can scale without running into networking constraints.
CNI vs. CNI Overlay:
Choosing CNI: The Azure CNI plugin integrates with Azure’s virtual network, allowing pods to have IP addresses directly assigned from the VNet address space. This is suitable for clusters with smaller node counts or where IP address management is crucial, such as when strict IP address controls are needed for compliance or integration with existing network infrastructure.
Using CNI Overlay: For larger clusters, the CNI overlay option is often more efficient, as it reduces the consumption of IP addresses by using an overlay network for pod communication. This is particularly beneficial in scenarios where IP address space is limited or when the cluster needs to scale to thousands of pods. However, CNI overlay might introduce some additional network latency, so it’s important to balance this against the need for IP address efficiency.
IP Address Planning:
Avoiding IP Exhaustion: IP exhaustion can be a significant issue in large clusters, particularly if using the Azure CNI plugin. Proper IP address planning involves ensuring that your VNet has a sufficiently large address space to accommodate the maximum number of nodes and pods you anticipate. It’s also wise to reserve some buffer space for future expansion, especially in environments where scaling needs might grow unexpectedly.
Subnet Scaling Strategies: As your cluster scales, you might need to expand the address space of your subnets. Azure allows you to add additional address spaces to your VNet, but this requires careful planning to ensure that there’s no overlap with existing IP ranges and that the network architecture remains efficient. Consider using separate subnets for different node pools to isolate workloads and simplify network management.
3. Additional Platform Considerations
Beyond node pools and networking, there are several other platform-level considerations that impact the capacity and scalability of your AKS cluster.
Load Balancer Scaling :
- Managing Limits and Capacity: Azure’s load balancers have specific limits, such as the maximum number of backend pool members or the number of inbound/outbound rules. As your cluster scales, it’s important to monitor these limits and plan for additional load balancers if necessary. For example, you might need to distribute traffic across multiple load balancers in a large-scale deployment to ensure that no single load balancer becomes a bottleneck.
Persistent Storage Scaling :
Scaling Volumes Dynamically: Persistent storage is another critical component, particularly for stateful applications. As the number of pods increases, so does the demand for persistent storage. Using Azure’s dynamic provisioning capabilities, you can scale storage volumes on demand to match the needs of your applications. This involves configuring storage classes that define the performance and capacity characteristics of the volumes, ensuring that your applications have the necessary IOPS and throughput to function effectively.
Managing Storage Limits: It’s also important to monitor storage quotas and limits in Azure, particularly in environments where large amounts of data are stored. Ensure that your storage solution can scale to meet your application’s needs without hitting performance bottlenecks or running out of capacity.
4. Cluster-Level Scaling with Karpenter
Karpenter is a node provisioning tool that optimizes the allocation of nodes within a Kubernetes cluster. It dynamically provisions nodes based on the specific requirements of the workloads running in the cluster, making it a powerful tool for managing capacity at the platform level.
Dynamic Node Provisioning: Karpenter automatically adjusts the size of your cluster by adding or removing nodes based on the needs of your workloads. Unlike traditional node autoscalers, which rely on predefined node pools, Karpenter can select the most appropriate VM SKU and size for the workload at hand, optimizing both performance and cost. This is particularly useful in environments with diverse workloads, where some applications may require high memory while others are more CPU-bound.
Integration with Kubernetes Autoscaling Tools: Karpenter works seamlessly with Kubernetes autoscaling tools like HPA and KEDA, providing a comprehensive solution for both pod-level and cluster-level scaling. By integrating Karpenter, you can ensure that your cluster scales efficiently in response to both application demands and underlying infrastructure constraints.
Optimizing for Cost and Performance: One of Karpenter’s key benefits is its ability to optimize for cost by selecting the most economical VM instances that meet your workload’s requirements. This can result in significant cost savings, especially in large clusters or those with varying workload demands. Additionally, by right-sizing nodes for specific workloads, Karpenter can improve overall cluster performance, reducing the likelihood of resource contention and improving application responsiveness.
Summary
Kubernetes Layer :
HPA Settings: Properly configure Horizontal Pod Autoscaler (HPA) with optimal min/max pod counts, considering workload characteristics, to ensure responsive scaling without over-provisioning. Adjust scaling aggressiveness based on the criticality of your applications, balancing between quick scale-ups and careful scale-downs to prevent disruptions.
Pod CPU and Memory Settings: Define resource requests and limits judiciously to guarantee necessary resources while avoiding over-allocation. Consider vertical scaling for resource-intensive, stateful applications and horizontal scaling for stateless, distributed workloads. In some cases, combining both strategies can provide optimal results.
Ingress/Gateway Capacity: Avoid bottlenecks by implementing rate limiting and ensuring sufficient replicas of ingress controllers to handle peak traffic. This ensures smooth traffic flow and high availability.
Advanced Scaling with KEDA: Utilize KEDA for event-driven scaling, allowing dynamic response to external events and custom metrics. Fine-tune scaling policies to align with specific workload demands, enhancing responsiveness and resource efficiency.
Underlying Platform Layer :
Node Pool Settings: Segregate workloads across different node pools to optimize resource allocation and cost. Right-size VM SKUs based on specific workload requirements, and ensure that autoscaling settings align with both performance needs and Azure subscription quotas.
Network and IP Address Capacity: Choose between Azure CNI and CNI overlay based on cluster size and IP address requirements. Plan IP address space and subnet scaling carefully to avoid exhaustion and ensure network efficiency as your cluster grows.
Load Balancer and Persistent Storage Scaling: Monitor load balancer limits and plan for high availability to prevent bottlenecks. Use dynamic provisioning for persistent storage to scale volumes according to application demands while managing storage limits to avoid performance issues.
Cluster-Level Scaling with Karpenter: Leverage Karpenter for dynamic node provisioning, optimizing both cost and performance by selecting the most appropriate VM instances for your workloads. Integrate with Kubernetes autoscaling tools for a comprehensive scaling solution that balances pod-level and cluster-level requirements.
Conclusion
Kubernetes capacity management and autoscaling in Azure Kubernetes Service (AKS) require a comprehensive approach that considers both the Kubernetes layer and the underlying platform.
By carefully configuring HPA settings, resource requests, and node pool configurations, while also addressing networking, storage, and load balancing considerations, you can ensure that your AKS environment is both cost-effective and responsive to changing demands.
Advanced tools like KEDA and Karpenter offer additional flexibility, enabling dynamic, event-driven scaling that aligns with modern cloud-native architectures.
As Kubernetes continues to evolve, staying informed about best practices and emerging tools will be key to maintaining optimal performance and scalability in your AKS deployments.
