Introduction
In the previous post, we have discussed how can we create a custom Docker container image.
In this post, we will build another custom Docker container image, this time a little more complex, using more than one files. Our container image will contain a Python based web application.
The scenario
We need to create a custom container image for a web application. The custom image will be based on the Python image, which is available on the Docker hub.
The application will also use two Python frameworks named Flask and Redis.
Flask is a web application framework developed in Python. Redis is used in Flask applications to build efficient task queues on a web site. A task queue will shift long processing task to be processed later, so that the web site can respond to the user faster.
The solution
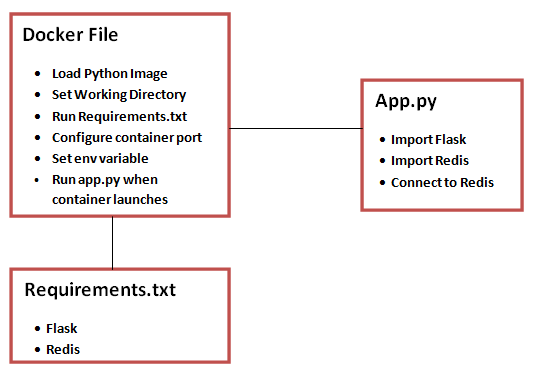
We have to create below 3 files :
- Dockerfile : This is the file which will be used to create the docker image.
- App.py : This file will configure Flask and Redis for the web application.
- Requirements.txt : This file is used to list down dependencies for the application which will run inside the container.
Create Project and Files
Now that we have understood the application architecture, lets create all these files under a new project.
Step 1: create a new project and switch to the project.
- mkdir /project1
- cd /project1
Step 2: Create a Dockerfile and insert contents
- vim dockerfile
(Press Shift+I to insert below block)
# Use an official Python runtime as a parent image
FROM python:2.7-slim

# Set the working directory to /app
WORKDIR /app

# Copy the current directory contents into the container at /app
COPY . /app

# Install any needed packages specified in requirements.txt
RUN pip install --trusted-host pypi.python.org -r requirements.txt

# Make port 80 available to the world outside this container
EXPOSE 80

# Define environment variable
ENV NAME World

# Run app.py when the container launches
CMD ["python", "app.py"]
(Press “Esc:wq” to save and exit from the vim editor)
In the above file, we have used a slimmer version of Python image, as the actual Python image is large.
Step 3 : Create another file called app.py and insert content
The app.py file defines the structure of actual application. In this case, it is a simple Hello World app using Flask. We are also integrating with Redis to manage task queues efficiently.
- vim app.py
(Shift+I)
from flask import Flask
from redis import Redis, RedisError
import os
import socket

# Connect to Redis
redis = Redis(host="redis", db=0, socket_connect_timeout=2, socket_timeout=2)

app = Flask(__name__)

@app.route("/")
def hello():
    try:
        visits = redis.incr("counter")
    except RedisError:
        visits = "<i>cannot connect to Redis, counter disabled</i>"

    html = "<h3>Hello {name}!</h3>" \
           "<b>Hostname:</b> {hostname}<br/>" \
           "<b>Visits:</b> {visits}"
    return html.format(
        name=os.getenv("NAME", "world"),
        hostname=socket.gethostname(),
        visits=visits
    )

if __name__ == "__main__":
    app.run(host="0.0.0.0", port=80)
(Esc:wq)
Step 4 : Create Requirements.txt and insert content
As mentioned before, the requirements.txt file defines the dependencies which the application needs to run. In this case, the application needs Flask and Redis, so we have mentioned these in the requirements.txt file.
- VIM requirements.txt
(Shift+I)
Flask
Redis
(Esc:wq)
Build the Docker Image
We have created Dockerfile and all related files. Now we are going to create our docker image.
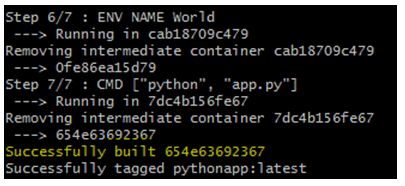
docker build -t pythonapp .
docker images

Run the container
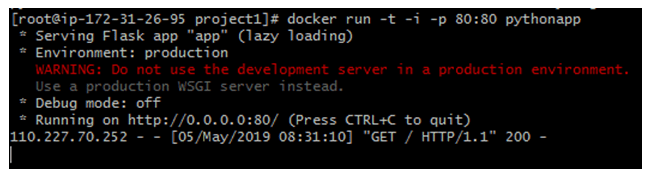
docker run -t -i -p 80:80 pythonapp
-t : Allocate a virtual terminal session within the container. This is commonly used with the option –interactive, -i
-p : These publish port mappings between the container and host that are defined in an image’s Dockerfile or by using the expose option, –expose. The option –publish, -p publishes a container’s port(s) to the host, while –publish-all , -P publishes all exposed ports.
We have started the container in default port (80).
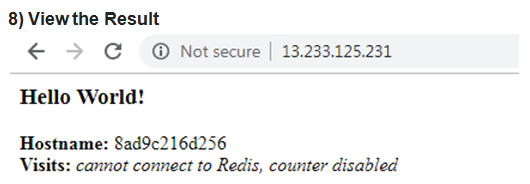
View the Result
Now, if you browse the site in server IP address you should see the Hello World web page.
Summary
In this post, we have created a container which is based on Python image. We have used a base Python image, and created a small web application within it using Flask. We have also used Redis for task queue management.
In real world , you might have to create containers for more complex applications, which consists of multiple files and dependencies. We have used requirements.txt to define all the application dependencies, like Flask and Redis. Typically, these files should be created by application developers.

One thought on “Create a Docker Container From Multiple Files”