Introduction
In the previous post, we have covered how to work with Docker container and Docker image.
In this post, we will see how to create a custom container image using Dockerfile. We will download an Ubuntu image from Docker hub and customize it as per our requirement. After that, we will build our custom Ubuntu image.
Dockerfile
A Dockerfile is a text file, which defines the list of commands which will run under the Docker container. If you want to create your custom image, first you need to create a Dockerfile.
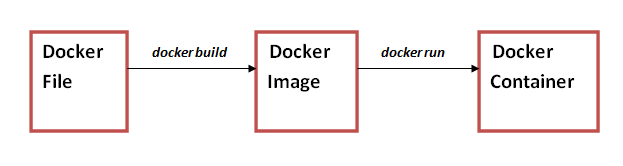
Once the Dockerfile is ready, we can use docker build command to build our custom image from the Dockerfile.
Some of the common Keywords which we can use in the Dockerfile are as follows :
1) FROM : This keyword defines the base image. This image will be pulled from Docker hub. Typically this is the first keyword that we use, because al the subsequent operations are done on the top of the base image.
2) RUN : This is one of the most frequently used keywords. As the name suggests, it executes a command on the base image.
3) Expose : This keyword exposes the container on a specific port, on which the outside world will access it.
4) ENV : This keyword sets environment variable through a key-value pair. The Key defines the environment variable, and the value defines corresponding value. Once defined for a variable, the value will be applicable for all down level commands, unless it is overridden by another environment value of the same variable.
5) ADD : This keyword copies file from a specified source, and adds it in container’s filesystem. In other words, it makes a remote file locally available to the container. The source location can also be a URL.
6) COPY : This keyword copies file from a specified , and adds it in container’s filesystem. However, unlike ADD, the source location cannot be a URL.
The ADD keyword have some additional capabilities over COPY keyword. However, for most of the copy operation, the COPY keyword is enough.
7) VOLUME : This keyword mounts a volume to the container. The volume source can be local host or another container.
8) USER : This keyword defines the user name or user group to use to run the container. Few commands within the container (Ex: RUN) will also be executed using this user or group name.
For a complete list of Docker keywords, please refer this link.
To know the best practices for writing Dockerfiles, please refer this link.
Install Docker
We will use an Amazon Linux EC2 system in this exercise. First we have to login as root user, update the system and install docker. Finally, we have to start the Docker service.
- sudo su
- yum update -y
- yum install docker
- service docker start
Create and Edit Dockerfile
First, we will create a new Project directory, where we will keep our custom image.
mkdir /project
Now, we will go to the project directory
CD /project
Now, create a new file named dockerfile (do not use any other file name)
vim dockerfile
Now we will edit our dockerfile and save it.
||||||||||||||||||||||||||||||||||||||||||||||||||||||||||||||||||||||||||||||||||||||||||||||||||||||||||||||||||||||||||||||||
FROM ubuntu:16.04
# Install dependencies
RUN apt-get update
RUN apt-get -y install apache2
# Install apache and write hello world message
RUN echo ‘Hello World!’ > /var/www/html/index.html
# Configure apache
RUN echo ‘. /etc/apache2/envvars’ > /root/run_apache.sh
RUN echo ‘mkdir -p /var/run/apache2’ >> /root/run_apache.sh
RUN echo ‘mkdir -p /var/lock/apache2’ >> /root/run_apache.sh
RUN echo ‘/usr/sbin/apache2 -D FOREGROUND’ >> /root/run_apache.sh
RUN chmod 755 /root/run_apache.sh
EXPOSE 80
CMD /root/run_apache.sh
|||||||||||||||||||||||||||||||||||||||||||||||||||||||||||||||||||||||||||||||||||||||||||||||||||||||||||||||||||||||||||||||
Build Docker Image
Now build the image from the dockerfile.
docker build -t webimage .
Notice the Dot (.) at the end. It means that the Dockerfile is available in current directory. Here, webimage is the name of the custom image which we are creating. You can specify any other name.
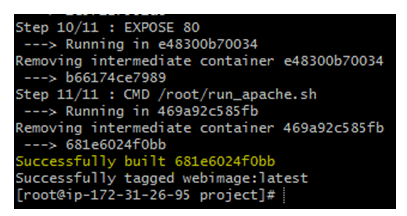
Once image build will be completed successfully, you should get a success message along with the image ID.
Verify that the image is created :
docker images

You can see that the webimage is present in the local image repository.
Create a Container from Image
Now we will create a container from our custom image.
docker run -t -i -p 80:80 webimage
Here, the first port is the host port and the second port is the container port. By doing this, we are telling that the Host Port 80 would be mapped to the container port 80. These two ports can be same or different.

Browse the web site
Now, open the server public IP in a browser. This should open the site, as it is running in default port.

So in this way, we have created a custom Docker Image from a simple source code, and ran the container. Now, you can push the custom image to your docker hub account for future use.
Summary
In this article, we have explored Dockerfile and created a custom Docker image.
For a complete list of Docker keywords, please refer this link.
To know the best practices for writing Dockerfiles, please refer this link.
