Why install Git Bash on local system
Installing Git Bash is essential if you plan to work with any Git-based source code repositories. Here’s why:
-
Work with Git Repositories: Whether it’s Azure Repos, GitHub, GitLab, or Bitbucket – if you want to clone a repo, pull the latest code, or push your changes, Git must be installed locally.
-
Command Line Access: Git Bash gives you a Unix-style terminal on Windows, which is especially useful for running Git commands and shell scripts smoothly.
-
Tool Integration: You can integrate Git with popular IDEs like Visual Studio Code, IntelliJ IDEA, Eclipse, or even Android Studio, enabling built-in source control features right inside your development environment.
-
Script & Automation Friendly: Automate common tasks (like builds or deployment) using shell scripts directly from Git Bash.
-
Consistency Across Teams: Ensures a consistent Git experience, especially in teams using a mix of Windows, macOS, and Linux.
Steps
Before we use Git on any system, first it needs to be installed on that system.
Git can be installed on Windows , Mac and Linux. In this article, we will install and configure Git on an Windows System. It can be installed on Server OS as well as Desktop line of Operating Systems.
We can download Git from this location. Make sure you download the version for Windows OS.
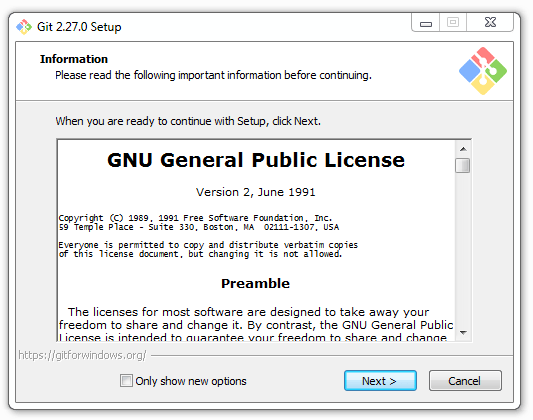
At the time of this publication, the latest Git version for Windows is 2.27.0, so we have downloaded this version in our system and started installing. Following diagrams will show each and every installation steps. For all the steps, we have kept default option and did not make any change.
The default components are fine, and we did not make any change.

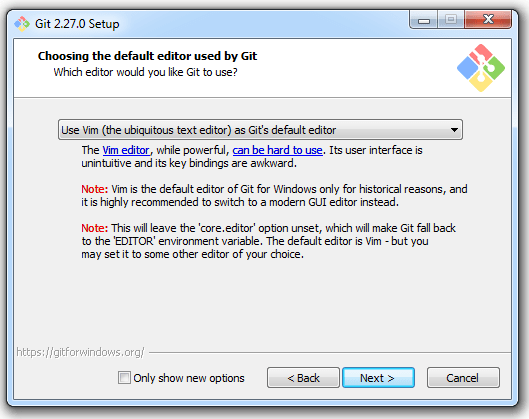
In the below screen, Git will prompt you to choose a default editor. This is the editor that opens when Git needs you to enter a message (like when doing an interactive rebase or writing a commit message without using -m).
By default, it selects Vim, but if you’re not comfortable with Vim, you can change it to something more familiar like:
-
-
Notepad++
-
Visual Studio Code
-
Nano
-
Notepad (Windows default)
-
Recommendation:
If you’re a beginner or prefer a graphical editor, choose Visual Studio Code (if already installed) or Notepad++ for ease of use.
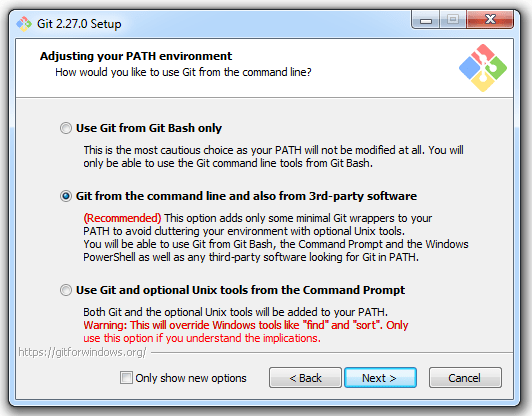
The following step determines how you can access Git from the command line after installation.
You’ll typically see three options:
-
Use Git from Git Bash only
Git will only be available inside the Git Bash terminal. This is safer for beginners but limited. -
Use Git from the command line and also from 3rd-party software (Recommended)
Git will be added to your system PATH, so you can use it from Git Bash, Command Prompt, PowerShell, or any terminal in IDEs like VS Code.
✅ Recommended, especially for developers using Git across different tools. -
Use Git and optional Unix tools from the Windows Command Prompt
This adds Git along with Unix tools (likels,cat, etc.) to your system PATH. This can cause conflicts with native Windows tools, so only choose this if you’re sure.
Recommendation:
Go with Option 2 – it gives you flexibility without messing with your system’s other tools.
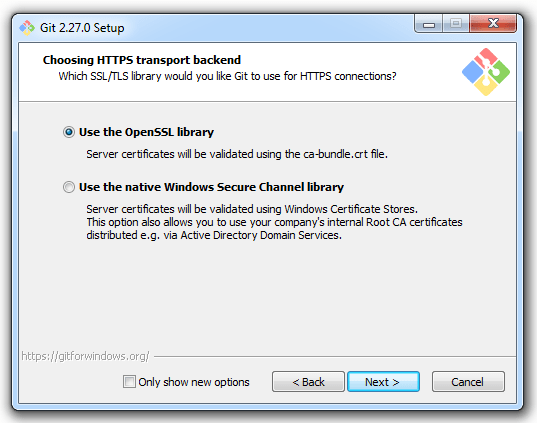
The following step asks how Git should handle HTTPS connections when communicating with remote repositories (like GitHub, Azure Repos, etc.).
You’ll see two options:
-
Use the OpenSSL library
This is the most common and widely supported option. It ensures secure communication with Git servers using standard SSL certificates.
✅ Recommended for most users, especially when working with GitHub, GitLab, Azure Repos, and other cloud-based Git providers. -
Use the native Windows Secure Channel library
This uses Windows’ built-in security layer instead of OpenSSL. Some corporate environments with strict security policies or internal certificate authorities may prefer this.
Recommendation:
Stick with OpenSSL, unless your organization specifically requires the Windows Secure Channel for internal Git servers.
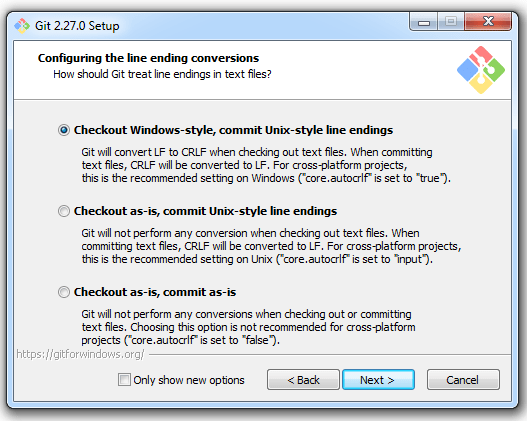
Next step deals with how Git handles line endings between different operating systems (Windows uses CRLF, while Linux/macOS uses LF).
You’ll see three options:
-
Checkout Windows-style, commit Unix-style line endings (Recommended)
-
Converts line endings to
CRLFwhen you checkout files (for Windows compatibility). -
Converts them back to
LFwhen you commit (for cross-platform compatibility).
✅ Recommended, especially if you’re working in a team with developers on macOS/Linux.
-
-
Checkout as-is, commit Unix-style line endings
-
No conversion when checking out.
-
Still commits with
LF.
Useful for tools that expect exact line endings, but may cause issues on Windows editors.
-
-
Checkout as-is, commit as-is
-
No conversion at all. Git stores exactly what’s on your system.
⚠️ Only use this if you know all contributors use the same OS and editor settings. Risk of inconsistent line endings.
-
Recommendation:
Choose Option 1 (Recommended). It keeps things clean and avoids headaches when collaborating across platforms.
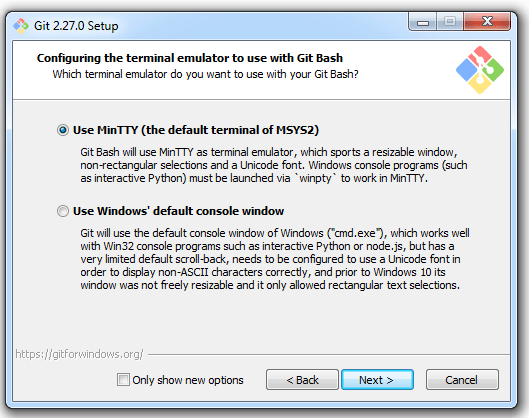
The following step decides which terminal Git will use when you run Git Bash.
You’ll typically get two options:
-
Use MinTTY (the default terminal of MSYS2)
-
This is a standalone terminal with features like resizable windows, copy-paste with mouse, and better font rendering.
✅ Recommended for most users. It’s user-friendly and provides a better terminal experience than the default Windows console.
-
-
Use Windows’ default console window (cmd.exe)
-
Opens Git Bash inside the classic Command Prompt window.
-
Use this only if you specifically need to run Git in the Windows console (e.g., for some legacy scripts or tools).
-
Recommendation:
Stick with MinTTY unless you have a specific reason to use the native Windows console.
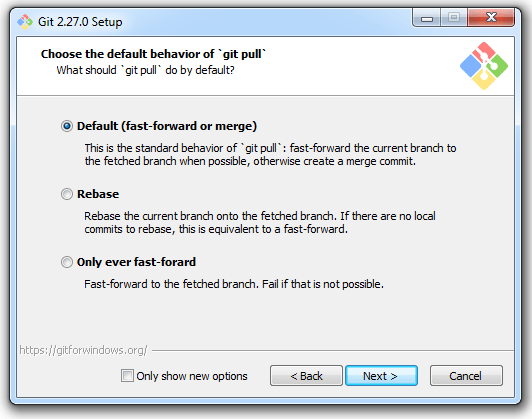
The next step is crucial and needs careful planning.
When you run git pull, Git fetches changes from the remote repository and then integrates them into your current branch. Here, you’re choosing how that integration should happen.
You’ll see three options:
-
Merge (default)
-
Combines remote changes with local commits by creating a merge commit.
-
📌 Advantage: Maintains full commit history and is easier to understand for beginners.
✅ Recommended if you’re just getting started or working in a team where preserving all commits matters.
-
-
Rebase
-
Rewrites your local commits on top of the latest remote changes.
-
📌 Advantage: Keeps history clean and linear, preferred in many modern Git workflows.
⚠️ Requires a good understanding of Git history and rebasing.
-
-
Only fast-forward
-
Updates your branch only if no divergent commits exist.
-
📌 Advantage: Prevents accidental merges but fails if any local commits exist.
-
Recommendation:
Stick with the default (Merge) unless you’re already comfortable with Git concepts like rebase and fast-forward. It’s safer for teams and beginners, and avoids confusion.
Note: This topic needs a dedicated discussion. We will add a post on this.
The following screen lets you enable some optional features that improve Git’s performance and usability on Windows.
-
Enable file system caching
-
Speeds up Git operations (like
git status) by caching file system data.
✅ Recommended – especially useful for large repositories.
-
-
Enable Git Credential Manager
-
Allows Git to securely store and manage credentials for remote repositories.
-
🔐 Required if you’re working with private repositories (like on GitHub, Azure Repos, GitLab, etc.) that need authentication.
-
Supports modern login methods like OAuth, Personal Access Tokens (PATs), and even SSO for enterprise users.
✅ Highly Recommended – saves you from entering credentials repeatedly.
-
-
Enable symbolic links
-
Allows Git to check out symbolic links in your project.
-
⚠️ Requires admin rights and Developer Mode enabled in Windows.
-
Only needed if your repo actually uses symlinks.
-
Recommendation:
-
✅ Enable file system caching and Git Credential Manager — both are helpful and safe for most users.
-
⚠️ Enable symbolic links only if your project specifically needs it.

The following setting enables Git Bash to use Windows’ newer ConPTY (pseudo console) feature for improved terminal handling.
What it does:
-
Improves compatibility with modern terminal features (like better cursor movement, colors, and input behavior).
-
Useful when you’re running Git Bash inside terminals like Windows Terminal, VS Code Terminal, or other tools that support ConPTY.
Things to consider:
-
🧪 It’s experimental, so you might run into occasional glitches or inconsistencies depending on your setup.
-
Some older tools or scripts may behave unexpectedly with it enabled.
Recommendation:
-
✅ If you use Windows Terminal or VS Code, you can try enabling it for better integration.
-
❌ If you prefer stability or use older tools, leave it unchecked.
📝 You can always re-enable or disable this later from Git Bash settings if needed.
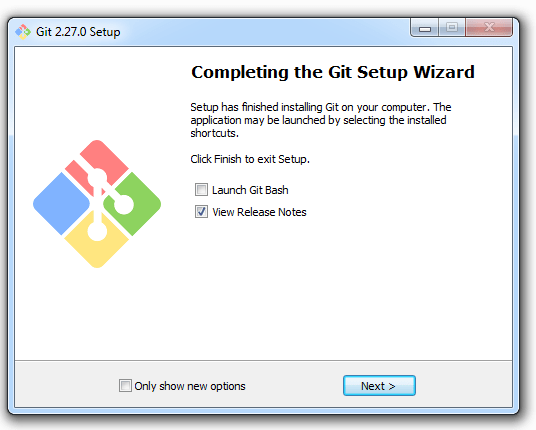
Once Git is installed, go to All Programs section in Windows, and you should be able to see Git. Create a desktop shortcut.
How to Access and Use Git After Installation
Now that Git is installed on your system, you can start using it in multiple ways depending on your preference:
✅ 1. Git Bash Console
-
Launch Git Bash from the Start menu or by right-clicking in any folder and selecting “Git Bash Here”.
-
This gives you a Unix-style shell where you can run all Git commands (
git clone,git status, etc.) and also use shell scripting.
✅ 2. Command Prompt or PowerShell
-
If you selected the option to “Use Git from the command line and 3rd-party tools” during installation, you can use Git commands directly from cmd.exe or PowerShell.
-
Helpful if you’re writing Windows batch scripts or prefer native terminals.
✅ 3. Visual Studio Code
-
If you selected VS Code as your default editor during installation, Git is already integrated.
-
You can open a folder containing a Git repo in VS Code and it will:
-
Show source control changes.
-
Allow you to commit, pull, push directly from the GUI.
-
Show Git history, diffs, and support Git commands via the built-in terminal.
-
-
🔧 No additional configuration needed if Git is in the system PATH and VS Code detects it automatically (which it does in most cases).
✅ 4. Other IDEs (Optional)
-
Tools like IntelliJ IDEA, Eclipse, and Android Studio also detect Git if it’s installed and added to the system PATH.
-
You may need to configure the Git executable path in the IDE settings (usually just once).
Post-Installation: Essential Git Setup (Do This Before Using Git)
Before using Git for the first time, it’s important to configure a few key settings. These help Git associate your commits with your identity and control how it behaves.
1. Set Your Name and Email (Must do)
Git uses this information to tag your commits. Run the following commands in Git Bash:
-
git config --global user.name "Your Full Name" -
git config --global user.email "your.email@example.com"
Use the same email linked to your GitHub, GitLab, or Azure DevOps account to avoid authentication issues when pushing code.
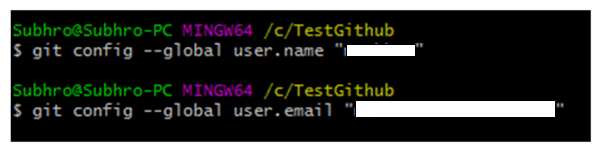
You need to do this only once if you pass the –global option, because then Git will always use that information for anything you do on that system. The option –global means it is valid for any git environment within this local system.
If you want to override this with a different name or email address for specific projects, you can run the command without the –global option when you’re in that project directory.
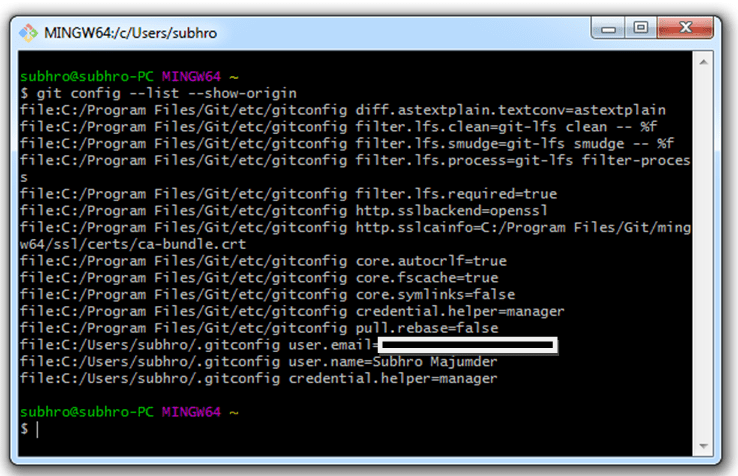
2. Check Your Git Configuration (recommended)
To check configuration of Git, run git config –list.
This shows both global and repository-specific settings.
If you add the –show-origin option, then it will also show the origin file of each configuration item.
3. Enable Colored Output (Optional)
To make Git output (like diffs or status) easier to read with color highlights, run:
-
git config --global color.ui auto
4. Set Default Branch Name (Optional)
To make Git use main instead of master as the default branch when creating new repositories, run:
-
git config --global init.defaultBranch main
5. Set Credential Helper Timeout (Optional)
If you’re not using Git Credential Manager, and want Git to remember your credentials temporarily:
-
git config --global credential.helper cache -
git config --global credential.helper "cache --timeout=3600"
(This keeps credentials in memory for 1 hour)
6. Set Line Ending Preferences (Optional)
To control line ending conversions (helpful when working across Windows and Linux/macOS), you can set:
-
git config --global core.autocrlf true
(Recommended on Windows to convert LF to CRLF on checkout)
