Introduction
Using Release Pipeline in Azure DevOps, you can fully automate and standardize infrastructure deployment.
In this article, we will discuss how to configure Azure DevOps for Terraform code deployment. We will use Azure Repo as our code repository, and Release Pipeline for Infrastructure Deployment. We will also use Variable Groups to store Terraform environmental variables, and Azure Key Vault to store their values.
To deploy your Terraform code with Release pipeline, you must ensure that your Terraform code is using remote state file. Please read my other article to configure remote state file for Terraform.
Best Practices
While deploying Terraform code through Azure DevOps, we have followed certain best practices :
1) The Source code is stored in Azure Repo, which is a version controlled Git repository.
2) Azure Repo Master branch is protected from accidental update, through branch protection.
3) Any change in the master branch must go through review and approval process.
4) Terraform State file is stored in a remote location, within an Azure Storage account.
5) All the sensitive information are stored in Azure Key Vault, which includes Azure Subscription ID, Tenant ID etc.
6) Terraform Plan and Terraform Apply are divided into two different stages. This makes the release pipeline safer to deploy, as the executor can review the Terraform Plan output and can assess what changes will take place in the target infrastructure, when this code will be deployed.
7) The deployment of each stage requires approval. This approach adds additional layer of security.
Step 1: Create new Azure DevOps Project
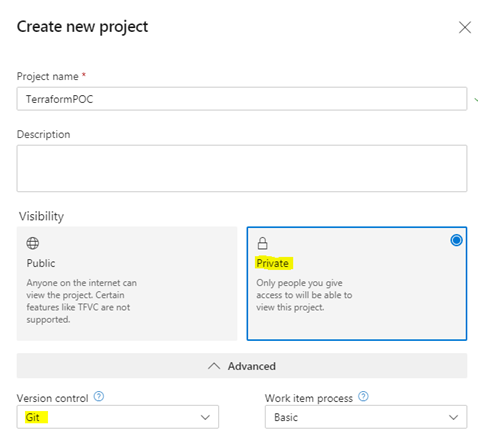
When creating new DevOps project, make sure that:
1) Project visibility is Private
2) Version Control is Git
Above two options are not mandatory, but strongly recommended and most widely used.
Step 2: Configure Azure Repo and add code
We will use Azure Repo as our source code repository.
Azure Repo is a Git based repository, which supports version controlling, branching, pull requests and all other necessary features which are offered by an industry standard Git.
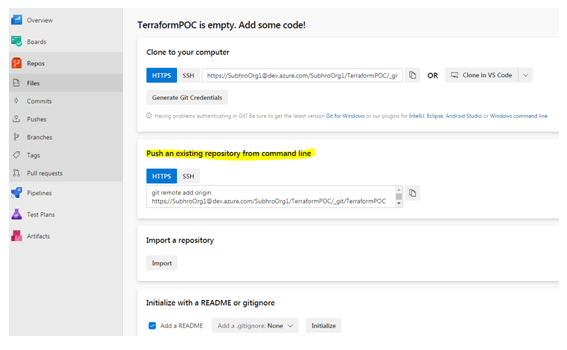
At present, our repository is empty.
There are multiple approaches for adding code to this repository. We will follow the second approach mentioned in above diagram, which means we will push existing code from our local computer repository to this Azure repo.
Git is already installed in our local system, and already initiated for our local Terraform working directory. We now need to add Azure Repo as our remote repository.
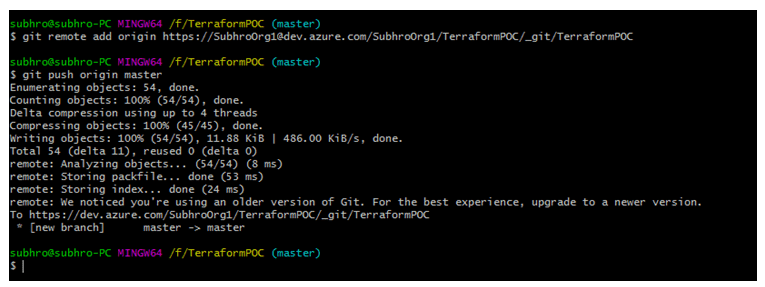
Once we push our code from our local Repo to Azure Repo, we should see the code folders and sub-folders in Azure Repo, similar to below figure.

So we have successfully pushed our code from local repo to Azure Repo.
Notice that the directory .terraform is not pushed to Azure Repo, because we have included it in the .gitignore file. We do not need this folder in Azure Repo, as this folder contains all the files and plug-ins which are used by local computer.
Also, no .tfvar file is present in this repo, which usually contains Terraform environmental variables like subscription id, tenant id, client id etc. As those are sensitive information, the pipeline will pull these values from Azure Key Vault with the help of variable group.
Protect Master Branch
As Master branch is the most critical branch, from where infrastructure will be deployed, we should protect this branch from accidental and unwanted changes.
Therefore, we should configure the master branch policy so that it requires some minimum number of approvals to update any file within this branch.
Ideally, there should be minimum two approvers, and the person who is requesting the update should not be one of the approvers. However, since I am the only approver in this lab environment, I have put minimum number as 1 and allowed requester to approve the change.
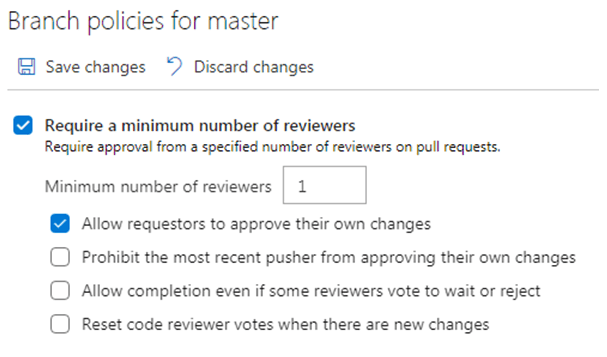
Once your configuration is done, save the changes. So master branch is now protected from accidental change.
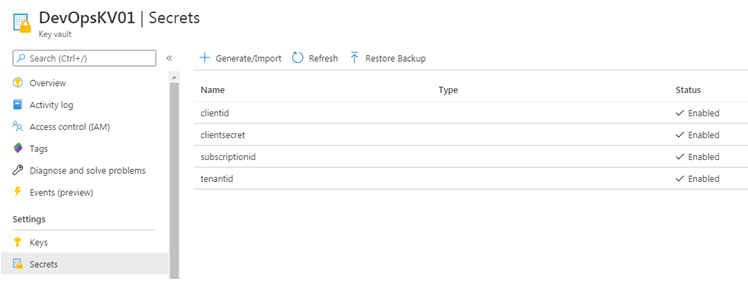
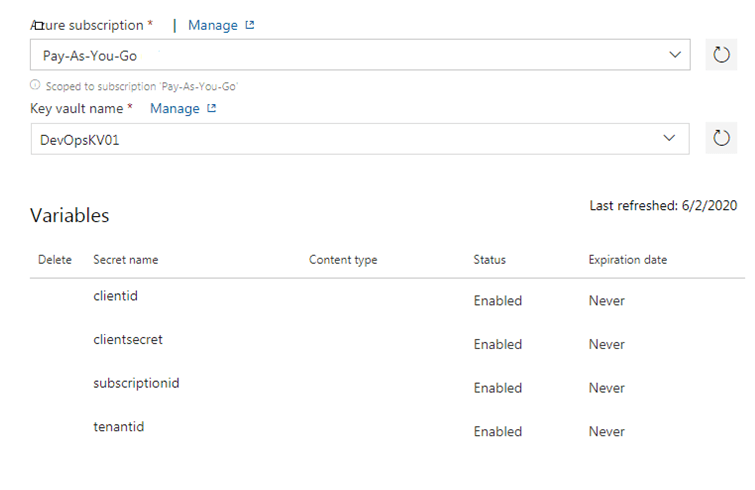
Step 3 : Store secrets in Azure Key Vault
We have created an Azure Key Vault, and stored following secrets :
1) clientid
2) clientsecret
3) subscriptionid
4) tenentid
The release pipeline need to have appropriate access to read secrets from Key Vault. However, we will not edit the access policy now, we will do it later.
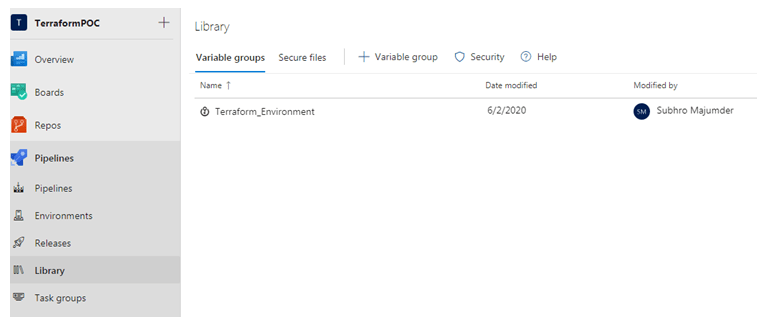
Step 4 : Create Variable Group
Variable group is an interesting feature of Azure DevOps, where you can define multiple variables under one variable group. You can also import these variables from Key Vault.
• Under Azure DevOps Pipeline, click on Library.
• Click + variable group
• Give a meaningful name to the variable group. We have named the group as Terraform_Environment, which means this variable group will store all environment variables of Terraform which are sensitive.
Since we want to pull the secrets from Azure Key Vault, enable the option Link secrets from an Azure key vault as variables.
Also, we want that all pipeline in this project can access these secrets. So we have kept the default option Allow access to all pipelines.
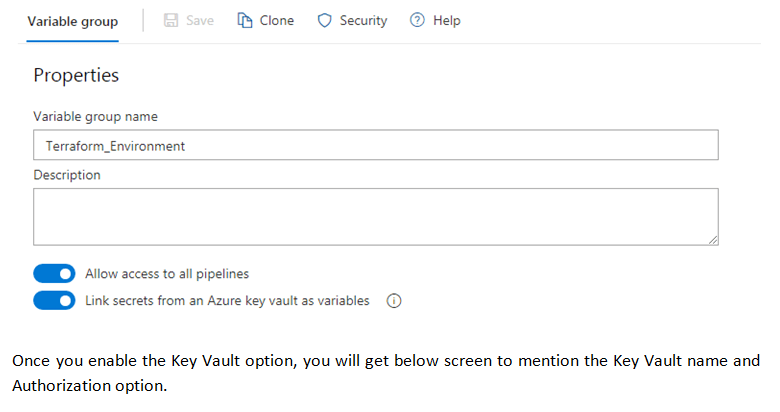
Once you enable the Key Vault option, you will get below screen to mention the Key Vault name and Authorization option.
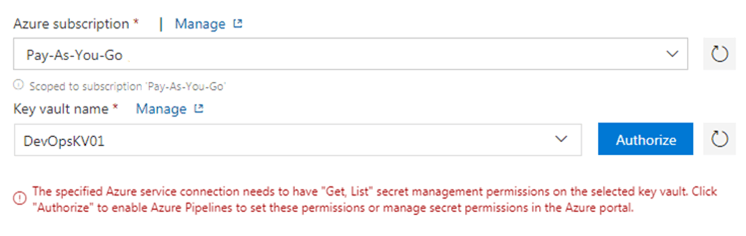
Once you click Authorize, it will add appropriate access policy to the Key Vault to get and list secrets.
At the same time, it will fetch all the secret names which are stored in Key Vault. However, it will not import secret values. The secret values will be imported when the release will be triggered, but the secret values will not be displayed in the release console due to security reason.
So in this way, we have ensured that all the sensitive information are protected and never exposed outside Azure Key Vault.
Once it is done, click Save to save the variable group.
Step 5 : Create Release Pipeline for infrastructure deployment
Now that our repository is all set, its time to create an configure release pipeline.
a) Assign Pipeline Name
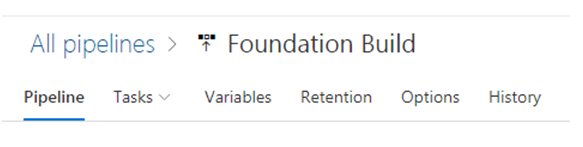
Assign a meaningful name to your pipeline. Here, we have assigned the name Foundation Build.
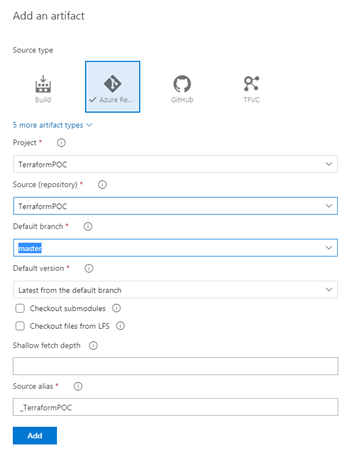
b) Add Artifact
Select Azure Repo as the artifact source. Select project name and default branch name, which should be master branch. The version should be latest from the default branch.
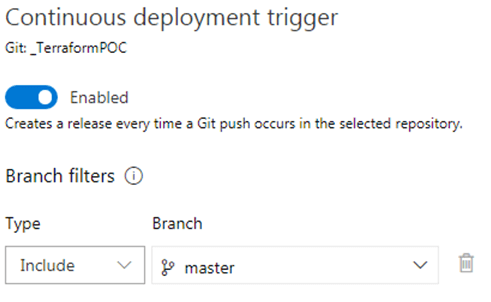
c) Configure Deployment Trigger
If you want to trigger the release as soon as there is some change in the master branch, then Enable Continuous deployment trigger.
Also include master branch in the branch filter, so that release will not be triggered when any other child branch will be updated.
If you want to trigger the release manually, then do not configure deployment trigger and you can skip this step.
Step 6: Create Terraform Plan Stage
As mentioned in the Best Practices section, we will create 2 stages.
- The first stage will run Terraform init and Terraform plan.
- The second stage will run Terraform init and Terraform apply.
This approach will allow Terraform executors to review the output of Terraform plan, before they execute Terraform apply. Once the reviewers are satisfied with the Terraform plan result, they can run second stage and execute Terraform apply.
We are running Terraform init at both stages, as both these stages will run on different agent computers. So when we run Terraform apply in stage 2, we need to run Terraform init before that.
In the Stages section, click on Add New Stage and select an Empty job template. Name the Stage as Terraform Plan.
So, we have created a release pipeline, configured artifact and added a stage. We are yet to configure any task in this stage.
Step 7: Add tasks in Terraform Plan stage
Now, we need to add following tasks in the Terraform Plan stage that we have created.
- Install Terraform
- Terraform Init
- Terraform Plan
Install Terraform is not a mandatory task, as we can also install terraform while running Terraform init task. However, this task will allow us to specify a particular version which would be installed in the release pipeline agent system.
- Click on the stage (1 job, 0 task) and then click on the ‘+’ sign on the agent job.
- In the search box, search with the word Terraform. This will display all the available tasks related to Terraform.
- Choose Terraform Tool Installer task.
- Give a meaningful Display Name
- Mention the Terraform version number which you want to install.

The next task is to run Terraform Init.
Once you search with terraform again, you will get few results related to terraform. I have used the Run Terraform task published by Peter Groenewegen for Terraform Init and Plan. You can try any other task as well.

After adding this task, you need to do some configuration :
- Display name
- Terraform template path (Under Azure Repo)
- Terraform argument (init)
- Check “Use Terraform service principle endpoint”.
- Select Azure Subscription, and Authorize if it is not authorized before.
- Select ‘Init state in Azure storage‘.
- Select ‘Specify Storage Account‘.
- Provide Storage Account and Container details, where the remote state file is stored.
- Click on Save.


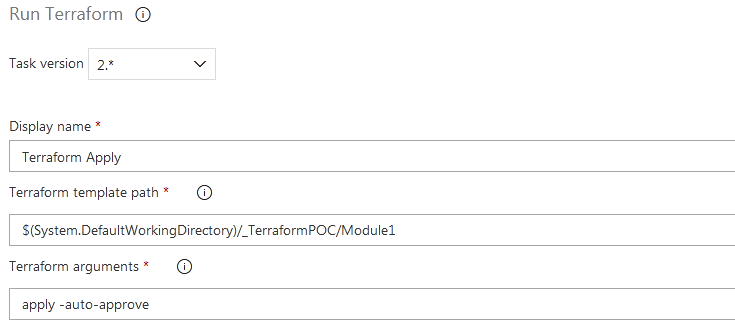
The next task is Terraform Plan.
We will clone the Terraform Init task (right click the task and clone) which we have just created, and make following changes :
- Display Name: Terraform Plan
- Terraform arguments : plan
All other values will remain same as previous task.

Click on Save.
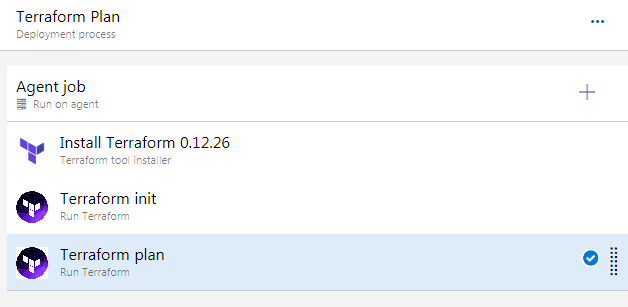
So we have created the Terraform Plan stage, and added above three tasks.
Step 8: Create Terraform Apply Stage
To create Terraform Apply stage, we will clone Terraform Plan stage which we have created in previous two steps.
Once you hover your mouse on the Terraform Plan stage, you will get clone option. Create a clone and name the cloned stage as Terraform Apply, or some other meaningful name. This will also clone all the 3 tasks within that stage.
The first two tasks (Install Terraform and Terraform Init) will remain unchanged.
We need to edit the third task, because instead of Terraform Plan, we have to run Terraform Apply in this stage. So make following changes :
- Change task name from Terraform Plan to Terraform Apply
- In the argument section, mention: apply -auto-approve
Notice that there is a space between apply and auto-approve. Since Terraform Plan requires a confirmation, the auto-approve will skip that confirmation section.
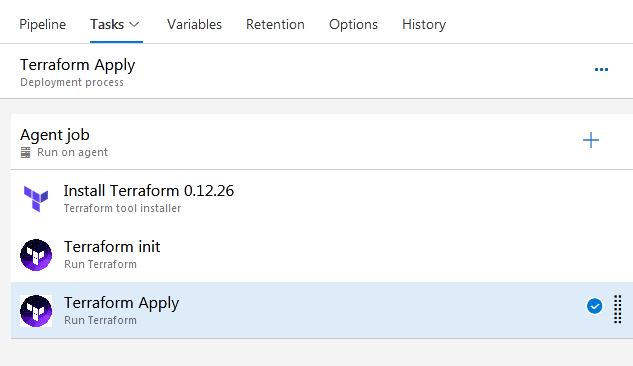
Once done, save this stage.
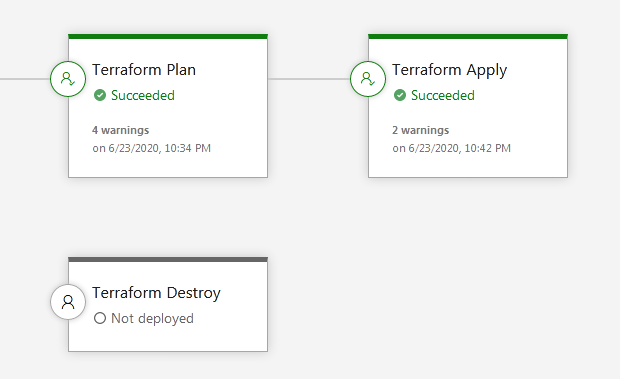
So now, our release pipeline is ready and will look like below diagram :

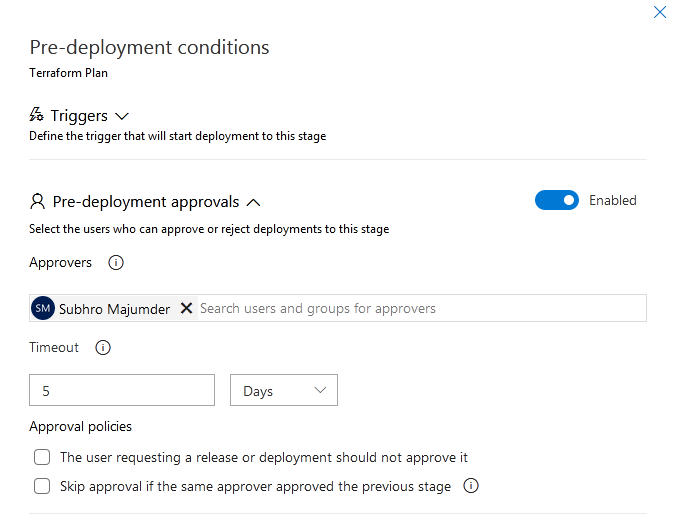
Step 9: Configure Pre-deployment conditions
We have configured pre-deployment conditions for both stages. This is one of the best practices, which ensures that an approval is required before the stage is triggered.
You can configure more than one approvers in each stage.
Ensure Terraform Apply stage has pre-deployment approval configured.
Logical flow of the release pipeline
Now that we have created the release pipeline, lets recap the logical flow.
1) The release will be triggered either manually, or once the Azure Repo master branch is updated.
2) To update the master branch, a child branch need to be created or updated, and a pull request need to be created. This pull request will go to approver(s). The approver(s) will review and approve / reject the code, and will merge the code with master branch if it is approved.
3) Once a release is triggered, it will check Stage 1 (Terraform Plan) pre-deployment conditions. Since we have configured pre-deployment approval, it will wait for the pre-deplyment approval.The approvers will get email notification in their mailbox.
4) Once the pre-deployment approval is done, the Terraform Plan stage will be triggered. It will download specified version of Terraform, will run Terraform init and finally Terraform plan. During this execution, it will also download environment variables from the Key Vault with the help of variable groups.
5) Once Stage 1 is completed, it will wait for the approval of stage 2, which is the Terraform Apply stage.
6) The approver(s) will check the output of Terraform Plan, and will assess what changes are going to happen in the target infrastructure. This is an extremely important step. They can check the console output of the stage 1 log, to get the result of Terraform Plan.
7) Once they are satisfied with Terraform Plan output, they will approve Terraform Apply stage.
Remember, once they approve this stage, the deployment will be started in the target infrastructure. Since we have used auto-approve switch with Terraform Apply, it will not ask for any further confirmation during deployment.
8) The Terraform apply stage will download Terraform, run Terraform init commands. Finally it will run Terraform apply (with auto-approve), which will deploy the target infrastructure.
Demo
We have done all the required configuration and discussed the logical flow of this pipeline, now lets run our code and deploy the infrastructure.
I have added a Terraform Destroy stage in this release pipeline, so that I can destroy the infrastructure after this demo. This stage needs to be triggered manually, and requires approval.
In real world, I do not suggest to create a destroy stage. Even if you create, please ensure that pre-deployment conditions are created and it should be approved by all key stakeholders.

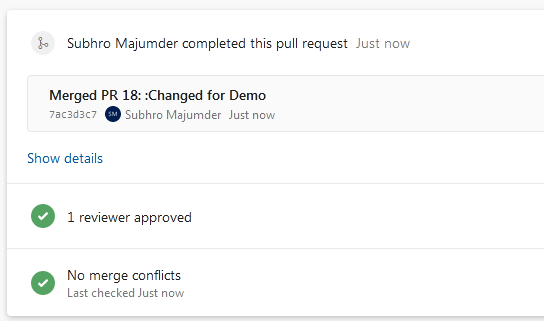
First, we will push our updated code through git to a child branch DemoBranch. This new branch will be created when we push our code.

This will give a message in Azure DevOps, to create a Pull request based on this new branch.

We have created a pull request, which has been approved by the code reviewers. Post approval, this is merged with the master branch.
Now that the master branch is updated, the release will be triggered. However, the first stage also need approval to proceed.

Once approved, the Terraform Plan stage will proceed and execute all three tasks.

Once you click on the Terraform plan agent job, you will be able to see the console output. This would help approvers to assess the changes in the target infrastructure.

Once the approver(s) are satisfied with the Terraform Plan output, they can approve the second stage, which is Terraform Apply.
Remember, once this stage is approved, the deployment will be started in the target infrastructure. Since we have used auto-approve switch with Terraform Apply, it will not ask for any further confirmation during deployment.

Once approved, the Terraform Apply stage will run and deploy target infrastructure in Azure.

As you can see, both the stages ran successfully.
Also notice that the stage Terraform Destroy has not been started, as we have to run this stage manually when required.
Summary
There are multiple approaches for Terraform code deployment through Azure DevOps, each having it’s own advantages and disadvantages.
You can also create a Build Pipeline to create an artifact based on the Terraform Plan output. However, that would add some complexity in the configuration, as you have to work on the YAML file.
The approach which we have followed in this article is easy, yet we have tried to follow all the best practices and security features.
