Azure provides two primary options to secure your data at rest on virtual machines:
-
Storage Service Encryption (SSE) :
This is automatically enabled for all managed disks and encrypts data at the storage level using Microsoft-managed keys or customer-managed keys (CMK). It operates transparently and cannot be disabled. -
Azure Disk Encryption (ADE) :
This is an optional feature that encrypts the OS and data volumes inside the VM using technologies like BitLocker (for Windows) and DM-Crypt (for Linux). ADE provides an added layer of security by encrypting data at the OS volume level, and it allows you to manage your own encryption keys via Azure Key Vault.
In this article, we will focus on configuring Azure Disk Encryption (ADE) for Windows Virtual Machines using PowerShell.
You’ll learn how ADE works under the hood, how to set it up securely using Azure Key Vault, and how to verify and manage the encryption status of your VM disks.
Important Points
-
- ADE is not supported on Basic, A-series VMs, Generation 2 VMs, Lsv2 series VMs, or on virtual machines with less than 2 GB of memory.
➤ For the full list of unsupported scenarios, refer to this documentation.
- ADE is not supported on Basic, A-series VMs, Generation 2 VMs, Lsv2 series VMs, or on virtual machines with less than 2 GB of memory.
-
-
There’s no additional cost for using Azure Disk Encryption itself. However, Azure Key Vault usage is billed separately, especially for key operations, HSM-protected keys, and high-throughput usage.
➤ See Azure Key Vault Pricing. -
For Windows VMs, ADE encrypts at the volume level (OS level) using BitLocker — not the disk level.
➤ Disk-level encryption is already handled by Storage Service Encryption (SSE) using Microsoft-managed keys (MMK) by default on Azure Managed Disks. -
ADE uses BitLocker for Windows to encrypt both OS and data volumes.
-
Azure Key Vault is required to store the disk encryption secret (generated by BitLocker) and optionally, a Key Encryption Key (KEK) to wrap it for added security.
-
When ADE is enabled, an extension is deployed to the VM, which you can view under the VM’s “Extensions + applications” blade.
-
For Windows VMs, the OS disk must be encrypted first. You cannot encrypt a data disk without encrypting the OS disk.
-
To encrypt a data disk, it must be mounted to the VM and formatted first.
➤ This ensures BitLocker can initialize the volume. -
On Windows Server 2016 and above, BitLocker uses XTS-AES by default.
➤ However, older domain Group Policy Objects (GPOs) may still enforce AES-CBC, which can cause ADE to fail. Always verify GPO compatibility before enabling ADE.
-
Disk Encryption Secrets & Keys
Azure Disk Encryption (ADE) uses a BitLocker-generated secret to encrypt the virtual machine disks. This is called Disk Encryption Secret (DES) . You do not need to manually create this secret — it is automatically generated during encryption and stored in the Key Vault’s Secrets store. Each VM gets its own unique encryption secret.
For Windows VMs, DES is created by BitLocker during the disk encryption process.
To enhance security and comply with enterprise key management policies, you can optionally configure a Key Encryption Key (KEK). The KEK acts as a wrapper that encrypts the ADE secret before storing it in the Key Vault. This additional layer of encryption helps protect secrets at rest, especially in regulated environments.
While using a KEK is not mandatory, it is considered a best practice, particularly in enterprises that require separation of duties, auditable key rotation, or compliance with internal/external security standards.
The use of KEK also greatly simplifies key rotation:
-
-
Without KEK : Rotating the BitLocker secrets involves creating a new Key Vault and reconfiguring ADE on each VM — a complex and time-consuming process.
-
With KEK : You can rotate just the KEK within the same Key Vault. The BitLocker secrets (DES) remain unchanged and continue to be encrypted using the new KEK. This approach is simpler and operationally efficient.
-
We will discuss the detailed process of key and secret rotation in the Key and Secret Rotation section later in this article.
For more on Azure Key Vault key management best practices, see
Microsoft’s official guidance.
Prerequisites
Before you configure disk encryption for an Azure Windows VM, ensure the following prerequisites are met:
- Latest PowerShell with Az Module:Since this article uses PowerShell for all operations, ensure your environment has the latest version of PowerShell and the Az module installed.
- Azure Key Vault (Same Region):You must either create a new Azure Key Vault or use an existing one, but it must reside in the same Azure region as your virtual machine.In our lab, we created a new Key Vault in the East US2 region, as our VMs are also deployed there.
- Key Vault Access Configuration:
- a) Assign permissions to your identity (user/service principal):Ensure the identity used to enable disk encryption has access to manage secrets and keys. Whether you use Access Policy or RBAC, the required permissions are:
- Secrets: list, create, delete
- Keys: list, create, import, delete
Azure now recommends using RBAC-based access control over classic Access Policies. If you’re using RBAC, assign roles such as:
-
- Key Vault Secrets Officer
- Key Vault Crypto Officer
- a) Assign permissions to your identity (user/service principal):Ensure the identity used to enable disk encryption has access to manage secrets and keys. Whether you use Access Policy or RBAC, the required permissions are:
-
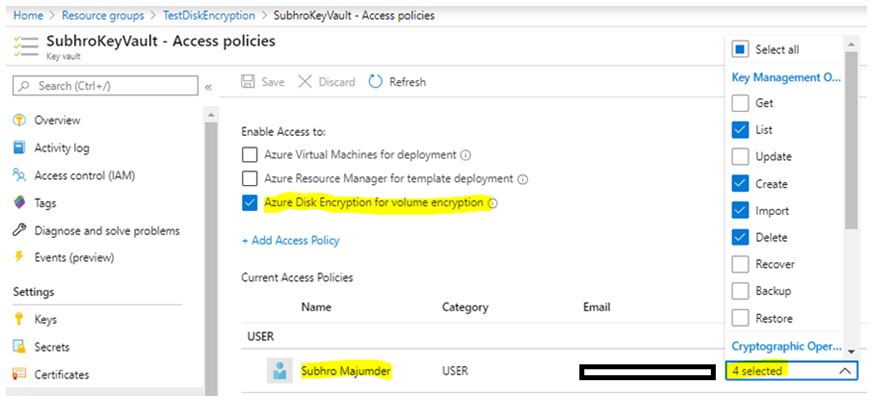
- b) Enable Azure Disk Encryption on the Key Vault:
This allows the Azure platform to retrieve disk encryption keys from the vault.Set-AzKeyVaultAccessPolicy -VaultName "<your-unique-keyvault-name>" -ResourceGroupName "MyResourceGroup" –EnabledForDiskEncryption
- b) Enable Azure Disk Encryption on the Key Vault:
Once you configure above two steps, you can see below Access Policies configured in Key Vault.
- Network Reachability:
Ensure that the Azure VM can access the Azure Key Vault endpoint and the Azure Active Directory endpoint.
If the VM is in a VNet with restricted outbound access (via NSG, UDR, or firewall), ensure required service tags (AzureKeyVault, AzureActiveDirectory) or FQDNs are allowed.
For more details on network requirements, refer to this documentation.
- Group Policy Compatibility (GPO):
Disk encryption may fail if the domain’s Group Policy enforces legacy encryption algorithms (e.g., AES-CBC) instead of the modern XTS-AES, which BitLocker uses by default on Windows Server 2016+.
Make sure GPOs do not block XTS-AES and allow required algorithms.
See this reference for Group Policy prerequisites.
Create Key Encryption Key (KEK)
This is an optional step — you only need to perform it if you want to encrypt your ADE secret using a Key Encryption Key (KEK).
As mentioned earlier, KEK adds one extra layer of security by wrapping the BitLocker-generated secret before storing it in Azure Key Vault.
The following PowerShell command creates a Key Encryption Key (KEK):
Add-AzKeyVaultKey -VaultName <KeyVaultName> -Name <EncryptionKeyName> -Destination "Software"
-
- Here, the value of the
Destinationparameter is set toSoftware, which means the key will be software-protected. - To create an HSM-protected key instead, set
DestinationtoHSM.
(Note: HSM-protected keys require the Key Vault to be in the Premium tier.)
- Here, the value of the
Once the command is executed, you can check the Azure portal to verify that the Disk Encryption Key (KEK) has been created and stored in the Key Vault.
For more details on creating and managing KEKs, please refer to
this official documentation.
Create an Azure VM
We have created a new Azure VM in our lab, using the Windows Server 2016 Datacenter Edition.
Both the Azure Key Vault and the VM are located in the same region, which is a requirement for enabling disk encryption.
The Azure VM has two disks attached:
-
- One OS Disk
- One Data Disk
None of the disks are encrypted at this point.
Important: Make sure the data disk is mounted and formatted within the operating system before you attempt to encrypt it.
Also, verify the disk encryption status from within the operating system before starting. You can use the following command from an elevated command prompt:
manage-bde –status
This will show the current BitLocker encryption status of each volume.
Enable Disk Encryption
Now that we have set the access policies and created the encryption key, let’s proceed with enabling disk encryption.
Use the following PowerShell command to enable disk encryption using a Key Encryption Key (KEK):
Set-AzVMDiskEncryptionExtension `
  -ResourceGroupName "MyResourceGroup" `
  -VMName "MyWindowsVM" `
  -DiskEncryptionKeyVaultUrl "https://<your-keyvault-name>.vault.azure.net/" `
  -KeyEncryptionKeyUrl "https://<your-keyvault-name>.vault.azure.net/keys/<kek-name>/<kek-version>" `
  -KeyEncryptionKeyVaultId "/subscriptions/<subscription-id>/resourceGroups/<resource-group>/providers/Microsoft.KeyVault/vaults/<your-keyvault-name>" `
You might have observed that while enabling encryption using the above script, we use two parameters:
-
- -KeyEncryptionKeyUrl
- -KeyEncryptionKeyVaultId
This is where we define the Key Encryption Key (KEK) to add an additional layer of security.
If you do not specify the KEK parameters, the disk will still be encrypted using a unique secret (DES) generated by BitLocker at the time of encryption. This secret will be securely stored in Azure Key Vault.
However, if you do specify the KEK parameters, then that BitLocker-generated secret will be wrapped by the KEK before being stored in Key Vault — offering an extra layer of protection and enabling easier key rotation.
Also, By omitting the -VolumeType parameter, Azure will encrypt both the OS and currently attached data disks. Additionally, any new data disks added to the VM in the future will also be automatically encrypted.
Validate Disk Encryption Status
There are several ways to ensure that the volumes have been encrypted successfully:
- Azure PowerShell :
Use the following command to check the disk encryption status:
Get-AzVMDiskEncryptionStatus
- Azure Portal :
Sometimes, the data disk encryption status may appear as Not Enabled in the Azure Portal — even when encryption is actually in place.
In such cases, verify the encryption status using PowerShell or directly from within the OS.
Tip: To refresh the portal view and reflect the correct encryption state for data disks, you may need to stop and start the Azure VM.
- OS Command Line :
From an elevated command prompt on the VM, run:
manage-bde –status
This will show the BitLocker encryption status of each volume inside the OS.
- Disk Management :
You can also open the Disk Management console to confirm encryption status. Encrypted volumes will be labeled as “BitLocker Encrypted”.
Important : When a disk shows as Encrypted, it only indicates that BitLocker has been enabled on the volume. It does not guarantee that encryption is 100% complete.
To verify completion, log in to the OS and check the encryption progress using the manage-bde –status command.
Data Disk Encryption
As mentioned before, you need to first encrypt the OS Disk in an Azure Windows VM if you want to encrypt its data disks.
For Azure Windows VMs, it is not possible to encrypt data disks without encrypting the OS disk. However, this limitation does not apply to Linux VMs.
The PowerShell command Set-AzVMDiskEncryptionExtension includes a parameter named -VolumeType, which controls what gets encrypted. It supports the following values:
-
- Omitted: If
-VolumeTypeis not specified, both OS and all attached data disks will be encrypted. Any new data disks added later to the VM will also be automatically encrypted. - All: Encrypts both OS and all data disks that are currently attached to the VM.
- OS: Only the OS volume will be encrypted.
- Data: Encrypts only data volumes — not supported for Windows VMs; use only with Linux VMs.
- Omitted: If
Note: While -VolumeType All and omitting -VolumeType may appear similar, omitting it applies to both existing and future disks. The All option may not reliably encrypt newly added data disks.
Recommendation: Omit the |
If you add a new disk to an encrypted VM, you must initialize and format the volume within the OS to activate encryption. You do not need to manually enable encryption — the new data disk is already encrypted by ADE.
You can run the following command from within the OS to verify encryption status:
manage-bde –status
However, to correctly reflect the encryption status of the new disk in the Azure Portal, you may need to stop and start the VM.
Backing up Encrypted VMs
Azure Backup supports backing up both Windows and Linux Azure VMs that are encrypted using Azure Disk Encryption (ADE).
However, there are a few important limitations associated with backing up and restoring encrypted VMs. When designing your backup solution, you should carefully consider the following:
1) Same Region and Subscription Only:
Backup and restoration of encrypted VMs must occur within the same subscription and region. The Recovery Services Vault must also be located in the same subscription and region as the VM.
2) No File/Folder Level Restore:
Encrypted VMs do not support file-level or folder-level restore.
Only full disk-level restoration is available — this applies to both Windows and Linux VMs.
3) Instant Restore Not Supported:
Instant Restore is currently not supported for encrypted VMs.
In order to back up and restore encrypted VMs, the Azure Backup Management Service must have access to the Azure Key Vault that holds the encryption secrets and keys.
Follow this link to understand how to grant appropriate access to Azure Backup.
For more details on encrypted VM backup scenarios and best practices, please refer to this article.
Disaster Recovery of Encrypted VMs
Microsoft has published an article outlining all the considerations when enabling Azure Site Recovery (ASR) replication for encrypted Azure VMs.
To facilitate replication of encrypted VMs, the encryption key(s) must be available in the disaster recovery (DR) region’s Key Vault.
If the user (who initiates the replication) has the necessary permissions, Site Recovery will automatically:
-
- Create a Key Vault in the DR region.
- Copy the encryption key from the primary Key Vault to the DR Key Vault.
However, if the user does not have the required permissions on the Key Vault, the Key Vault administrator must manually export and copy the encryption key to the DR Key Vault. Microsoft provides a PowerShell script to assist with this process.
For detailed guidance, refer to this Microsoft article.
Disable Disk Encryption
To disable Azure Disk Encryption (ADE) for a Windows Azure VM, use the following command:
Disable-AzVMDiskEncryption
As per Microsoft documentation:
-
-
- This command is supported only for Azure Windows VMs.
- It does not work for Linux VMs.
-
Once the command is executed, a special extension is installed that handles the decryption process. The VM will need to reboot, and the disks will be decrypted in-place.
There is another command called Remove-AzVMDiskEncryptionExtension, but this does not disable disk encryption. It only removes the ADE extension from the VM — the disks remain encrypted.
Important: If your goal is to completely disable disk encryption and decrypt the volumes, always use Disable-AzVMDiskEncryption, not Remove-AzVMDiskEncryptionExtension.
Key and Secret Rotation
Many organizations have strict security policies that mandate the periodic rotation of encryption keys, secrets, and passwords.
If you need to rotate the disk encryption secret or the Key Encryption Key (KEK), follow the procedures below:
-
To rotate the Disk Encryption Secret (DES): Run the same
Set-AzVMDiskEncryptionExtensioncommand, but this time specify a different Key Vault. This is required because the original Key Vault already contains the old encryption secret for this VM, and ADE will continue to use it. ADE does not automatically detect or use newer versions of that secret — it is tightly bound to the specific version of the secret at the time of encryption.By pointing to a new Key Vault, a new encryption secret will be generated and used for disk encryption moving forward. -
To rotate the Key Encryption Key (KEK): You can use the same
Set-AzVMDiskEncryptionExtensioncommand, referencing the same Key Vault, but this time specify a new KEK. This will rewrap the existing disk encryption secret with the new KEK, without requiring you to change the Key Vault or re-encrypt the disks.
In general, it is recommended to rotate the Key Encryption Key (KEK) periodically. This is a more manageable and scalable approach compared to rotating the disk encryption secrets.
By rotating only the KEK:
-
- You do not need to provision a new Key Vault.
- You avoid unnecessary re-encryption of disks or redeployment of ADE.
For detailed instructions and best practices on key management, please refer to this Microsoft article.
When Not to use ADE
-
-
When using confidential VMs or SSE with CMK, ADE may not be required.
-
ADE can break snapshot portability and complicate DR scenarios.
- ADE for VMSS (Scale Sets) has limitations in auto-scaling scenarios and requires coordinated key access.
-
Comparison: Disk Encryption Secret (DES) vs Key Encryption Key (KEK)
| Aspect | DES (Disk Encryption Secret) | KEK (Key Encryption Key) |
|---|---|---|
| Storage Type in Azure Key Vault | Stored as a Secret | Stored as a Key (software or HSM-backed) |
| Uniqueness | Unique per VM (each server gets a distinct BitLocker-generated secret) | Can be reused across multiple VMs |
| Requirement | Mandatory for Azure Disk Encryption | Optional — used for added security and key management |
| Version Handling | Tied to a specific secret version; does not auto-update | Tied to the latest key version by default; supports seamless rotation |
| Rotation Strategy | Complex — requires a new Key Vault to trigger generation of a new secret | Simple — create a new version of the KEK in the same Key Vault |
| Recommended for Rotation | ❌ No — operationally heavy and not scalable | ✅ Yes — recommended best practice |
| Encryption Function | Encrypts the OS/Data volumes using BitLocker or DM-Crypt | Encrypts (wraps) the DES before storing it in Key Vault |
Comparison: Azure Disk Encryption (ADE) vs Storage Service Encryption (SSE)
| Aspect | ADE (Azure Disk Encryption) | SSE (Storage Service Encryption) |
|---|---|---|
| Purpose | Encrypts the OS and data volumes within the VM using BitLocker (Windows) or DM-Crypt (Linux) | Encrypts the managed disk data at rest in Azure Storage infrastructure |
| When It Happens | Encryption is applied inside the guest OS (volume level) | Encryption is applied automatically when data is written to the disk (storage level) |
| Encryption Mechanism | BitLocker for Windows, DM-Crypt for Linux | Uses AES 256-bit encryption (handled by Azure Storage platform) |
| Who Manages Encryption | You (via VM + Key Vault). You configure keys, policies, and encryption scope | Azure manages it by default, but you can use Customer-Managed Keys (CMK) |
| Key Storage | Disk Encryption Secret (as Secret) and optional KEK (as Key) stored in Azure Key Vault | Keys are managed by Azure (MMK), or optionally by you if CMK is enabled |
| Use Cases | – You need encryption that is OS-aware (e.g., BitLocker compliance) – You need full control over encryption secrets and rotation – You have regulatory needs (e.g., BitLocker required by policy) |
– You want transparent, low-maintenance encryption – You don’t need OS-level encryption – Default protection for all Azure Managed Disks |
| Performance Impact | May introduce slight overhead inside the guest OS | No performance impact — handled at the storage layer |
| Flexibility | Granular control but more operational effort | Simple and default for all Azure Managed Disks |
| Rotation of Keys | Manual: rotate KEK or use new Key Vault to rotate secrets | Easy: automatic (for MMk) or manual (for CMK) key rotation |
🔒 How They Protect Your Data:
-
- Azure Disk Encryption (ADE): Protects data inside the OS using BitLocker or DM-Crypt. It ensures that even if someone mounts the disk offline, the volume remains inaccessible unless unlocked.
- Storage Service Encryption (SSE): Protects data at the storage layer by encrypting it before it is persisted and decrypting it during retrieval — all handled transparently by Azure.
